


13-14
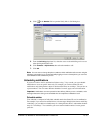
4. In the Page using field, select the dialing service that you want Strata CS to use to dial
your pager. For more information about dialing services, see
“Using dialing services”
on page 12-8.
5. In the Dial Sequence field, enter the dial string for your pager, including the phone
number of the paging service and your pager's PIN, if required. The dial string can
contain any touch tone digit (0-9, *, #). You can enter commas to indicate 2-second
pauses in the dial sequence.
You can also use the following special characters to add information to the page:
Q I or i sends the Caller ID number (for an external call) or Strata CS extension (for
an internal call).
Q E or e sends the Strata CS extension that the caller dialed.
Q L or l sends the length of the voice message in seconds.
Example: The dial sequence
18007771000,,,1245983#E
causes Strata CS to dial your
paging service, pause for 6 seconds, enter your pager’s PIN (1245983) followed by #
to indicate end-of-PIN, enter your extension (the extension at which the voice message
was left), and then hang up. Your pager would display only the extension, 103 for
example.
6. Click OK.
Notes
Q If you receive only the last portion of the pager data that you specify, you may not have
placed enough pauses between the pager number to be dialed and the information to
send. If this problem occurs, add more commas to the Dial Sequence field.
Q Do not enter multiple stars (*) in a row in the pager string. Use only one star to send a
dash. Multiple consecutive stars can terminate the page message.
Setting up call notifications
Strata CS places notification calls to the number of your choice. The call says, “<the queue’s
voice title> has a new voice message from <caller’s voice title if available>. Press # to hear your
message.” By pressing #, you can log onto the queue’s account and hear the new message, and
even press
4 3 to call the person back.
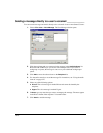
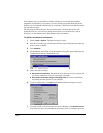
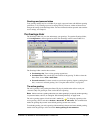
1. Choose Tools > Options. The Options dialog box opens.
2. Click the Voice Messages \ Call Notification tab.
3. Select one of the following notification options from the dropdown list:
Q Do not place call notifications. Calls are not placed when the queue receives new
voice messages.
Q Place call for all messages. A call is placed whenever the queue receives a new
voice message.
Q Place call for urgent messages only. A call is placed whenever the queue receives
a voice message marked urgent.