


NDA-24282 CHAPTER 3
Page 39
Revision 1.0
INSTALLATION
5.2 UPGRADING PROCEDURE
STEP 1 : Print out the existent data in the MIS terminal or save the data as the text file.
Note 4
STEP 2 : List up the office data related to the current ACDP.
STEP 3 : Shutdown MIS operation following the appropriate procedure.
Note 4
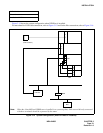
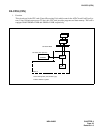
STEP 4 : Make busy the CPU (ACDP) card (CP53/CP54) and disconnect all cables connected to cards
related to ACD.
STEP 5 : Upgrade the PBX hardware following the Upgrade Manual for the PBX.
STEP 6 : Install the software below to upgrade the PBX software. Refer to Chapter 3, Section 4.1, “ACD
Software Installation”.
• An assortment of software for NEAX2400 IMX
• Built-in ACDP software
Note 1
• System Configuration Software containing ACD Options
Note 2
STEP 7 : Program the following ACD commands data again.
ACDTN/ACDSPL/ACDLOG/ACDPSN/ACDCCV/ACDPLT/ACDTG/ACDANA/ACDIVR/
ACDHS/ACDHC/ACDWS
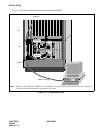
STEP 8 : Start up the Navigator MIS for IBMPC/AT.
Note 3
• Standard MIS hardware and software
• MIS terminal hardware and software
STEP 9 : Start up the IVR/Host.
Note 4
• IVR/Host hardware and software
• Related Equipment for LAN
STEP 10 : Perform the installation test.
Note 1:
When ACD service is used in a Fusion Network, and when “ACD Trunk in aFusion Network” is used:
Install the software into the node that accommodates the ACDP.
When “AGENT ANYWHERE” is used:
Install the software into one node only. In this case, the node with the most ACD agent positions is
recommended to prevent network traffic congestion. The node that uses the ACDP is most recommended
according to the service condition Item 3 described in “Agent Anywhere - ACD” in Chapter 5.
Note 2:
When ACD features are activated in Fusion network, this software is installed in all nodes.
Note 3:
This procedure is not necessary for the ACD without MIS.
Note 4:
Details for start-up procedure are decided by the IVR/Host feature specifications.
This procedure is not necessary when IVR/Host is not used.