Operational Features
41-001343-02 REV04 – 05.2014 5-195
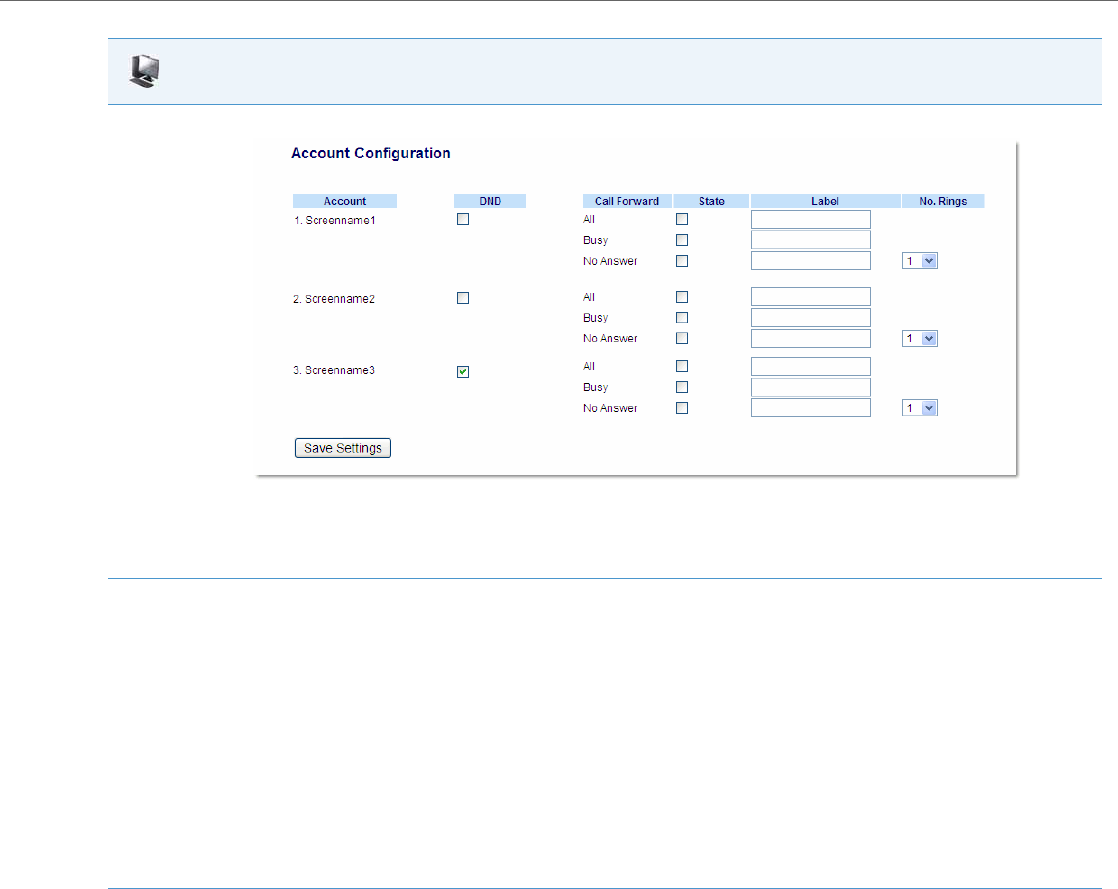
6. Click on Basic Settings->Account Configuration.
Note:
If the BroadSoft BroadWorks Executive and Assistant Services feature is enabled and your phone is configured with the Assistant’s role, an
additional Forward Filtering option may be available on the Account Configuration page. For information on the BroadWorks Executive and
Assistant Services feature, refer to BroadSoft BroadWorks Executive and Assistant Services Feature on page 6-44. For details on how to con-
figure and utilize Forward Filtering, please refer to the respective phone model’s Aastra SIP IP Phone User Guide.
7. For each account, enable CFWD state by placing a check mark in one or more of the following “State” fields:
• All
• Busy
• No Answer
The “All” option forwards all incoming calls for this account to the specified phone number regardless of the state of the phone. The phone
can be in the Busy or No Answer states, or can be in the idle state. The phone still forwards all calls to the specified number.
The “Busy” option call forwards incoming calls only if the account is in the busy state. The calls are forwarded to the specified phone number.
The “No Answer” option call forwards incoming calls only if the account rings but is not answered in the defined number of rings. The call
gets forwarded to the specified number.
Note:
You can use the “Busy” and “No Answer” states together using different forwarding phone numbers. If these states are enabled for an
account (the “All” state is disabled), and the phone is in the busy state when a call comes in, the phone can forward the call to the specified
phone number (for example, voicemail). If there is no answer on the phone after the specified number of rings, the phone can forward the
call to a different specified number, such as a cell phone number.
8. For each account, in the “Number” field, enter the phone number for which you want the incoming calls to forward to if the phone is in the
specified state.
If using the “Account” mode or “Custom” mode, you can enter different phone numbers for each account.
Notes:
• If you selected “Account” mode in step 4, you can enable/disable each account or all accounts as applicable. You can enter different phone
number for each enabled state.
If you selected “Custom” mode, you can enable/disable each account or all accounts as applicable. You can enter different phone numbers
for each enabled state.
If you selected “Phone” mode, all accounts are set to the same CFWD configuration (All, Busy, and/or No Answer) as Account 1 on the
phone. (In the Aastra Web UI, only Account 1 is enabled. All other accounts are grayed out but use the same configuration as Account 1.)
Using the Aastra Web UI, if you make changes to Account 1, the changes apply to all accounts on the phone. Using the IP Phone UI, if you
make changes to any other account other then Account 1, the changes also apply to all accounts on the phone. When enabling a CFWD
state, you must specify a phone number for the phone to CFWD to. The number you specify applies to all accounts of the same mode.
• Number and name of accounts that display to this screen are dependant on the number and name of accounts configured on the phone.
In the screen in step 6, Screenname1 is configured on Line 1, Screenname2 is configured on Line 2, and Screenname3 is configured on Line
3. The name for the account is dependant on the name specified for the “Screen Name” parameter at the path Advanced Settings->LineN.
If you do not specify a value for the “Screen Name” paramet
er, the account name is based on the “Phone Number” parameter at the path
Advanced Settings->LineN. If neither the “Screen Name” nor the “Phone Number” parameters are specified, the account name shows “1”, “2”,
“3”, etc. only.
Aastra Web UI


