


Network Settings
4-26 41-001343-02 REV04 – 05.2014
IP Phone UI
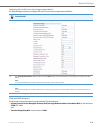
1.
Press on the phone to enter the Options List.
2. Select Administrator Menu.
3. Enter your Administrator password.
Note:
The IP Phones accept numeric passwords only.
4. Select Network Settings.
5. Select Static NAT.
6. Select NAT IP.
7. Enter a public IP address of your NAT device in dotted-decimal format.
8. Press Done to save the setting.
9. Select NAT SIP Port. Default is 51620.
10. Enter the public SIP signaling port number of your NAT device.
11. Press Done to save the setting.
12. Select NAT RTP Port.
13. Enter the RTP Port number of your NAT device. Default is 51720.
14. Press Done (4 times) to finish.
Note:
The session prompts you to restart the IP phone to apply the configuration settings.
15. Select Restart.
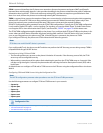
For the 6739i:
Note:
NAT is disabled by default. Use this procedure to enable NAT if required.
1. Press the Options key on the phone to enter the Options List.
2. Press Advanced. A keyboard displays.
3. Enter the Administrator password using the keyboard. Default is “22222”.
4. Press Network.
5.
Press to scroll to the next screen.
6. Press the NAT Settings button.
7.
Press Static NAT, enter a public IP address of your NAT device, in dotted-decimal format, in the text box, and press .
8. Press NAT SIP Port, and enter the public SIP signaling port number of your NAT device. Default is 51620.
9. Press NAT RTP Port, and enter the RTP Port number of your NAT device. Default is 51720.
10.
Press until the Options List screen displays.
11. Press Restart to restart the phone for the change to take affect.
For the 6867i:
Note:
NAT is disabled by default. Use this procedure to enable NAT if required.
1.
Press on the phone to enter the Options List.