


Strata CTX670 Installation
Install Processor and Universal PCBs
4-50 Strata CTX I&M 06/04
BECU/BBCU Installation
CAUTION!
• Do not remove the plastic insulation shield from the back of the BBCU PCB. If the
shield comes off, do not allow the back of the PCB to contact metal.
• The BBCU PCBs are shipped from the factory with the battery jumper in the “Off”
position. Ensure it is moved to the “On” position before installing the BBCU to protect
customer configuration information stored in the BBCU RAM.
• When transporting the BBCU PCB, keep the battery jumper in the “On” position in
order to save the configuration data stored in BBCU RAM. (The battery will protect
RAM for approximately six years.) Otherwise, to conserve the lithium battery, move
the jumper to the “Off” position.
• When packaging the BECU and BBCU PCBs, use only a nonconducting material
enclosure, such as plain cardboard. Conductive material can cause the internal battery
to discharge and erase memory in the BECU and BBCU PCBs.
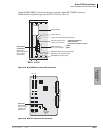
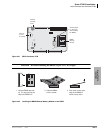
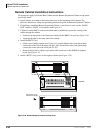
1. Set the battery jumper, “BATT,” on the BBCU PCB to the “On” position.
2. On the BBCU, make sure the Mu/A jumper plug is set to the Mu position (U.S. and Canada).
3. Before you install the BBMS, make sure the “ATTACHED BBMS” jumper is set to “NO.”
4. After installing the BBMS, change the “ATTACHED BBMS” jumper to “YES.”
5. If you are installing the Basic system, skip to Step 6. If you are installing the Expanded system,
install the BBMS and BEXS onto the BBCU and BECU respectively.
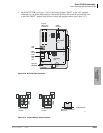
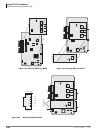
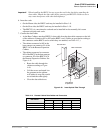
6. Install the BBMS onto the BBCU (see Figures 4-31 and 4-32). Install the BEXS onto the
BECU (see Figures 4-33 and 4-35).
7. If serial ports are required, install the BSIS onto the BECU (see Figures 4-34 and 4-35).
8. Make sure that the power supply is Off when installing the BBCU and BECU PCB or damage
to the board could result.
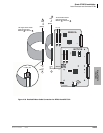
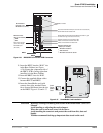
9. Install the BECU in slot B101 and the BBCU in slot B102, then connect the two BECU ribbon
cables to the BBCU, as shown in Figure 4-36.
10.Proceed with system startup procedure in the Strata CTX Programming Manual.
³ To adjust the CTX670 MOH/BGM source
³ Adjust the VR1 potentiometer to the desired volume level while listening to MOH or BGM
(see Chapter 12 – Peripheral Installation).