


Strata CTX670 Installation
Mount Cabinets
4-10 Strata CTX I&M 06/04
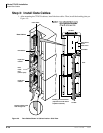
Step 2: Mount Cabinets
There are two methods of mounting cabinets: wall or floor mounting. Wall mounting the most
common and economical method is described below. The floor mounting description begins on
page 4-33.
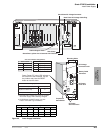
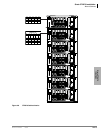
Note Toshiba recommends installing cabinets (see Figures 4-4~4-10) from the top down, Base
Cabinet on top, first Expansion Cabinet below it, second cabinet below that, etc.
Wall Mounting the Base (Top) Cabinet
Follow these instructions to wall mount the Base Cabinet or the first Remote Expansion Cabinet.
A wooden backboard between the cabinet and the wall is necessary (see Figure 4-4).
1. Obtain a board, such as plywood, that is at least 3/4 of an inch thick. The board should be at
least 6-1/2 feet high (completely expanded systems with seven cabinets require this much
height) and 26 inches wide (minimum).
Secure the board to the wall with wood screws with the bottom edge of the board is six inches
above the floor. (If there are wall studs, make sure the screws align with the studs.)
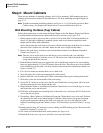
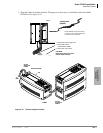
2. Remove the front, back, and side covers from the Base Cabinet or first Remote Expansion
Cabinet (see Figure 4-5).
Note The two screws on the front cover and the two screws on each side cover should be
loosened just enough to slide the covers off. The front cover slides left and the side covers
swing out and down for removal.
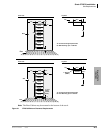
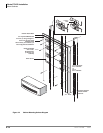
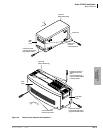
3. Hold the Base Cabinet back cover against the wall or backboard so that its two top mounting
holes are approximately 6-1/2 feet (78 inches) above the floor. This allows up to seven cabinets
to be installed (top-down) with a six-inch clearance between the floor and bottom cabinet (see
Figures 4-6 and 4-7).
4. Use a level to make sure that the back cover is held level.
5. Trace the upper arch of the top mounting holes with a pencil.
6. Remove the back cover from the wall. Draw a line between the top two marking hole marks.
7. Drill holes on the line in the middle of the arch tracing.
8. Screw #12 X 2 inch size wood screws into the two drilled holes, leaving about 1/8 of an inch
clearance between the screw heads and the wall.
9. Hang the Base Cabinet or first Remote Expansion Cabinet back cover from the top two screws
and secure the screws into the wall.
10. Drill holes at the bottom two mounting holes of the back cover, and secure #12 X 2 inch wood
screws into the two holes.
11. If installing a Base Cabinet or first Remote Expansion Cabinet back cover to the wall: Position
the cabinet on the back cover cabinet hangers, slide the cabinet right to the proper mounting
position, and secure the cabinet to the back cover with two screws on the right side of the
cabinet. If installing Expansion Cabinets, skip to “Wall Mounting Expansion Cabinets” on page
4-11.
12. Install ground wiring, AC and reserve power cabling, and PCB cabling per the “Recommended
Installation Sequence” on page 4-6.
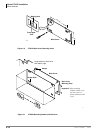
13. Fill out the slot identification label on the cabinet (see Figure 4-8).
14. Reinstall the front cover, top cover, and side covers onto the cabinet.