


Chapter 13 Install Analog Terminal Adapters 283
Installation and Maintenance Guide
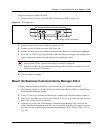
Configure the ATA 2
Use this procedure to configure the Business Communications Manager ATA 2 using the Business
Communications Manager Unified Manager. For detailed information about using Unified
Manager, refer to the Business Communications Manager 3.0, Programming Operations Guide.
1 Open the Unified Manager.
2 Assign the following line features to the Business Communications Manager ATA 2:
• assign one external line to the telephone
• set ringing for this line ON or OFF, as required
• assign one intercom line
• assign Held Line Reminder to ON
• disable Full Handsfree
• disable Handsfree Answerback
• disable Paging Reception
3 Assign an external line, an intercom line, or a line pool as the Prime Line for the Business
Communications Manager ATA 2.
4 Exit the Unified Manager.
5 Set the Business Communications Manager ATA 2 to Tones ON when you are assigning an
analog voice device.
Set the Business Communications Manager ATA 2 to Tones OFF when you are assigning a
data communication device.
For details, refer to the Business Communications Manager ATA 2 User Guide. The default is
Tones OFF.
6 This procedure is complete.
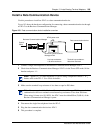
Test the ATA 2
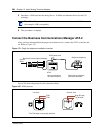
Confirm that the Business Communications Manager ATA 2 is operating by connecting a
single-line telephone to the Business Communications Manager ATA 2. Make an internal call and
an external call using the telephone connected to the ATA 2. Next, call the Business
Communications Manager ATA 2 from an system telephone. Refer to the Business
Communications Manager ATA 2 User Guide for details.
Note: Direct access to a CO line for modems, fax machines and credit card
verification machines is possible using the Hotline feature. For direct access to a
CO line, program an external line as the Hotline. Enter a pause to replace the
telephone number for the Hotline (F78).