


168 Chapter 7 Hard Disk Replacement Procedures
P0993133 03
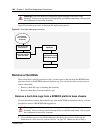
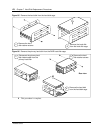
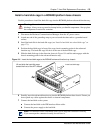
Remove a hard disk cage from a BCM400 platform base chassis
Use this procedure to remove the hard disk cage from the BCM400 advanced function tray. Use
this procedure to remove a BCM400 RAID upgrade kit.
1 If you still have access to the Unified Manager, shut down the system by following the
instructions in “Shut down the system software” on page 145. Otherwise, skip to step 2.
2 Set up the server for maintenance, as described in “Shut down the system hardware” on page
146. Continue to the next step of this procedure when complete.
3 Disconnect the Business Communications Manager from the AC power outlet.
4 Attach one end of the grounding strap to your wrist and the other end to a grounded metal
surface.
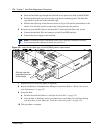
5 Partially remove the BCM400 advanced function tray (see “Remove the advanced function
tray” on page 157). Do not to pinch or stretch any cables when sliding the advanced function
tray partially out of the platform base chassis.
6 Locate the hard disk in the advanced function tray.
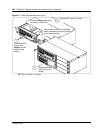
7 Disconnect the hard disk cables from the system:
a Disconnect the power supply connector from the hard disk.
b Disconnect the hard disk connector at the I/O card.
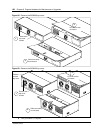
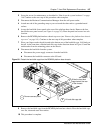
8 Carefully remove the advanced function tray. Do not pinch or stretch any cables when sliding
the advanced function tray completely out of the platform base chassis.
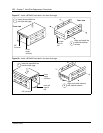
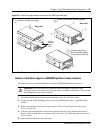
9 Remove the transportation HDD cage restraint screw and keep in a safe place.
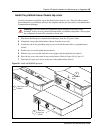
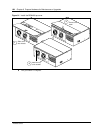
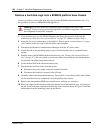
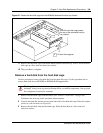
10 Place your fingers under the tab located at the bottom rear of the hard disk cage. Lift firmly on
the tab. At the same time, slide the hard disk cage in the direction shown in Figure 94 until the
unit detaches from the mounting points on the chassis.
Warning: Protect the hardware components against damage from electro-static
discharge. Always wear a ground wriststrap before you handle components. Always place
the components in static-free container.