


Chapter 7 Hard Disk Replacement Procedures 173
Installation and Maintenance Guide
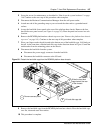
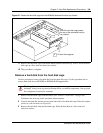
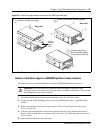
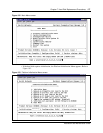
Figure 99 Install the programmed hard disk into the RAID hard disk cage
3 This procedure is complete.
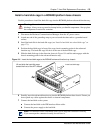
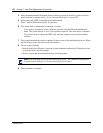
Install a hard disk cage in a BCM200 platform base chassis
Use this procedure to install the hard disk cage into the BCM200 platform base chassis.
1 Disconnect the Business Communications Manager from the AC power outlet.
2 Attach one end of the grounding strap to your wrist and the other end to a grounded metal
surface.
3 Remove the platform base chassis top cover (see “Remove the platform base chassis top
cover” on page 161).
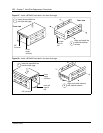
4 You can access the hard disk location from a panel at the rear of the platform base chassis.
Remove the four hard disk access panel screws (see Figure 93). Place the panel and screws in
a safe location.
5 Install the hard disk in the hard disk cage.
Warning: Protect the hardware components against damage from electro-static
discharge. Always wear a ground wriststrap before you handle components. Always place
the components in static-free container.
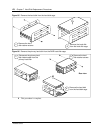
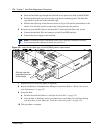
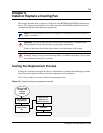
Install the programmed (primary) hard
disk into the hard disk cage
1
Connect the primary
hard disk ribbon cable
to the primary hard disk
3
Rear view
Rear view
Install the hard disk retaining screws
2
Primary
hard disk
ribbon
cable