


182 Chapter 8 Install or Replace a Cooling Fan
P0993133 03
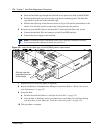
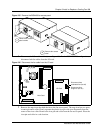
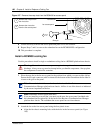
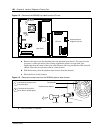
Figure 107 Remove the snap rivets from the BCM400 fan access panel
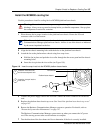
8 Lift the fan away from the fan access panel and place it in a safe location.
9 Repeat Steps 7 and 8 to remove the redundant fan on the BCM400 RFO configuration.
10 This procedure is complete.
Install a BCM400 cooling fan
Use this procedure to install a single or redundant cooling fan in a BCM400 platform base chassis.
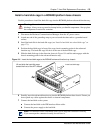
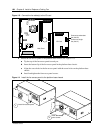
1 Place the new fan in the fan access panel in the position from which you removed the old fan.
Ensure the I/O card connector cable is oriented to the bottom of the fan and that the fan label is
closest to the grill on the panel.
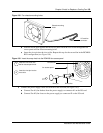
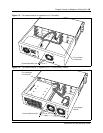
2 Attach the fan to the fan access panel using the four plastic rivets.
a Align the fan chassis mounting holes with the holes in the fan access panel (see Figure
108).
Warning: Protect the hardware components against damage from electro-static
discharge. Always wear a ground wriststrap before you handle components. Always place
the components in static-free container.
Note: Ensure the label of the new fan faces the back wall of the Business
Communications Manager platform base chassis. Airflow is out of the chassis as indicated
by the arrows imprinted on the fan.
Note: Redundant feature option (dual fans)
If you are installing a second fan, you must use the new fan access panel (included with
the redundant feature option kit) on the back of the Business Communications Manager
platform base chassis. The redundant fan access panel has two fan exhausts.
fan access panel
Rivet pin
Rivet collar
Fan exhaust
Remove the rivet collar
from the fan access panel
Remove the rivet pin from
the rivet collar.
2
1