


174 Chapter 7 Hard Disk Replacement Procedures
P0993133 03
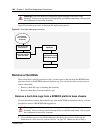
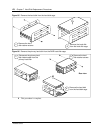
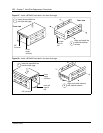
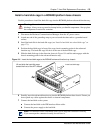
a Insert the hard disk cage through the hard disk access panel in the back of the BCM200.
b Position the hard disk cage in front of the cage chassis mounting points. The hard disk
cage lift tab is at the rear of the hard disk cage.
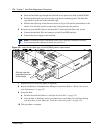
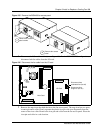
c Slide the hard disk cage in the direction shown in Figure 100 until the unit attaches to the
chassis. You will hear and feel a snap as the locking tab slips into position.
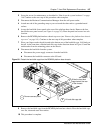
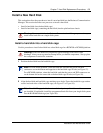
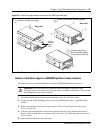
6 Reconnect power and IDE cables to the hard disk. Connect the hard disk to the system:
a Connect the hard disk I/O card connector to the I/O card IDE interface.
b Connect the power supply to the hard disk.
Figure 100 Insert the hard disk cage into the BCM200 platform base chassis
7 Replace the cover and access panel (if required).
8 Restore the Business Communications Manager to operation. Refer to “Restart the System
after Maintenance” on page 147.
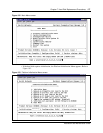
9 Set up the disk:
a Initialize the hard disk. Refer to “Initialize the Hard Disk” on page 176.
b After the disk is initialized, restore your data from your backups. If you did not backup
your keycodes, re-enter them (see “Enter the software keycodes” on page 142).
10 This procedure is complete.
Note: All connectors have a notch that allows you to align the connectors correctly.
If you cannot push a connector in easily, do not force it.
Slide the hard disk
cage toward the front
of the chassis