


Chapter 7 Hard Disk Replacement Procedures 175
Installation and Maintenance Guide
Install a hard disk cage in a BCM400 platform base chassis
Use this procedure to install the hard disk cage into the BCM400 platform advanced function tray.
1 Disconnect the Business Communications Manager from the AC power source.
2 Attach one end of the grounding strap to your wrist and the other end to a grounded metal
surface.
3 Install the hard disk in the hard disk cage (see “Install a hard disk into a hard disk cage” on
page 171).
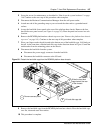
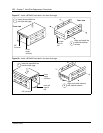
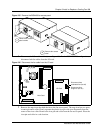
4 Position the hard disk cage in front of the cage chassis mounting points in the advanced
function tray. The hard disk cage lift tab is at the rear of the hard disk cage.
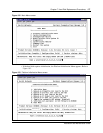
5 Slide the hard disk cage in the direction shown in Figure 101 until the unit engages with the
chassis mounting points in the advanced function tray.
Figure 101 Insert the hard disk cage to the BCM400 advanced function tray chassis
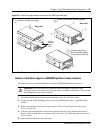
6 Partially insert the advanced function tray into the BCM400 platform base chassis. Ensure you
do not pinch any cables against the chassis or internal components.
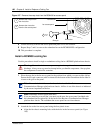
7 Connect the hard disk to the system:
a Connect the hard disk to the IDE interface ribbon cable.
b Connect the power supply to the hard disk.
Warning: Protect the hardware components against damage from electro-static
discharge. Always wear a ground wriststrap before you handle components. Always place
the components in static-free container.
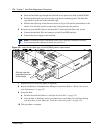
Note: All connectors have a notch that allows you to align the connectors correctly.
If you cannot push a connector in easily, do not force it.
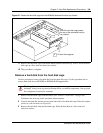
Lift and slide the hard disk cage
toward the front of the AFT chassis
Insert hard disk cage