


Chapter 7 Hard Disk Replacement Procedures 171
Installation and Maintenance Guide
Install a New Hard Disk
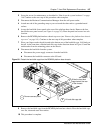
This section describes the procedures to install a new hard disk into the Business Communications
Manager. This section describes two processes to install a hard disk:
• Install a hard disk (into the hard disk cage)
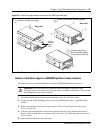
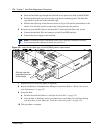
• Install a hard disk cage (containing the hard disk) into the platform base chassis
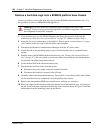
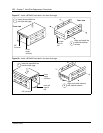
Install a hard disk into a hard disk cage
Use this procedure to install a hard disk into a hard disk cage for a BCM200 or BCM400 platform.
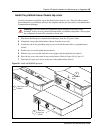
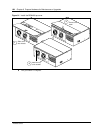
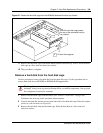
1 Position the hard disk into the hard disk cage.
2 Align the hard disk and hard disk cage retaining screw holes. Fasten the hard disk cage retainer
screws into both sides of the hard disk cage (see Figure 97 or Figure 98).
Warning: You must initialize the Business Communications Manager system when you
install a new hard disk on a single-disk system.
Warning: Protect the hardware components against damage from electro-static
discharge. Always wear a ground wriststrap before you handle components. Always place
the components in static-free container.
Note: For a BCM200 platform, orient the hard disk such that the power and IDE
connectors are on the bottom and opposite to the hard disk cage lift tab (see Figure 97).
For a BCM400 platform, orient the hard disk such that the power and IDE connectors are
on the bottom and on the same side as the hard disk cage lift tab (see Figure 98).
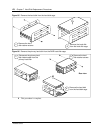
Note: For a RAID upgrade kit, the mirror disk and primary disk ribbon cables are
pre-installed. If applicable, install the programmed hard disk from your single disk system
into the RAID hard disk cage (see Figure 98).