


Chapter 8 Install or Replace a Cooling Fan 187
Installation and Maintenance Guide
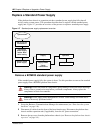
Install the BCM200 cooling fan
Use this procedure to install a cooling fan in a BCM200 platform base chassis.
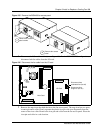
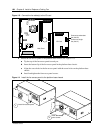
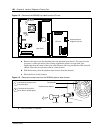
1 Place the new fan in proper location in the platform base chassis. Ensure the I/O card
connector cable is on the bottom.
2 Align the fan chassis mounting holes with the holes on the platform base chassis.
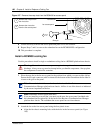
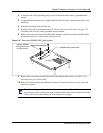
3 Attach the fan to the platform base chassis using four snap rivets:
a Hold the fan in place and push the rivet collar through the fan access panel and fan chassis
mounting holes.
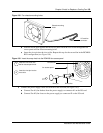
b Insert the rivet pin into the rivet collar (see Figure 109).
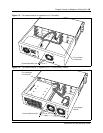
Figure 114 Insert the snap rivets into the BCM200 platform base chassis
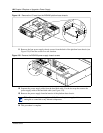
4 Connect the power supply cable to the I/O card. Connect the Fan to connector #1 on the I/O
card.
5 Replace the platform base chassis top cover. See “Install the platform base chassis top cover”
on page 163.
6 Restore the Business Communications Manager system to operation. For details, refer to
“Restart the System after Maintenance” on page 147.
The Business Communications Manager system starts up when you connect the AC power
cord. The start-up process takes several minutes to complete.
7 Test the direction of the fan exhaust air flow to determine if the fan is correctly installed.
Warning: Protect the hardware components against damage from electro-static
discharge. Always wear a ground wriststrap before you handle components. Always place
the components in static-free container.
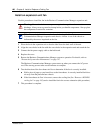
Note: Ensure the label of the new fan faces the back wall of the Business
Communications Manager platform base chassis. Airflow is out of the chassis as indicated
by the arrows imprinted on the fan..
Platform base chassis
Rivet pin
Rivet collar
Fan exhaust
Insert the rivet collar into
the fan access panel hole.
Insert the rivet pin into the
rivet collar.
1
2