


190-00498-07 Rev. A
Garmin G1000 Pilot’s Guide for Cessna Nav III
8
SYSTEM OVERVIEW
SYSTEM
OVERVIEW
FLIGHT
INSTRUMENTS
EIS
AUDIO PANEL
& CNS
FLIGHT
MANAGEMENT
HAZARD
AVOIDANCE
AFCS
ADDITIONAL
FEATURES
APPENDICESINDEX
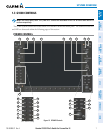
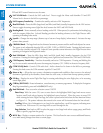
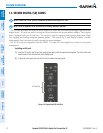
PFD and MFD control functions are the same.
1
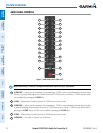
NAV VOL/ID Knob
– Controls the NAV audio level. Press to toggle the Morse code identifier ON and OFF.
Volume level is shown in the field as a percentage.
2
NAV Frequency Transfer Key
– Transfers the standby and active NAV frequencies.
3
Dual
NAV Knob
– Tunes the MHz (large knob) and kHz (small knob) standby frequencies for the NAV receiver.
Press to toggle the tuning cursor (light blue box) between the NAV1 and NAV2 fields.
4
Heading Knob
– Turn to manually select a heading on the HSI. When pressed, it synchronizes the heading bug
with the compass lubber line. Selected Heading provides the heading reference to the Flight Director while
operating in Heading Select mode.
5
Joystick
– Changes the map range (distance top to bottom of map display) when rotated. Activates the map
pointer when pressed.
6
CRS/BARO Knob
– The large
knob sets the altimeter barometric pressure and the small
knob adjusts the course.
The course is only adjustable when the HSI is in VOR1, VOR2, or OBS/SUSP mode. Pressing this knob centers
the CDI on the currently selected VOR. Selected Course provides course reference to the Flight Director when
operating in Navigation and Approach modes.
7
Dual COM Knob
– Tunes the MHz (large knob) and kHz (small knob) standby frequencies for the COM
transceiver. Pressing this knob toggles the tuning cursor (light blue box) between the COM1 and COM2 fields.
8
COM Frequency Transfer Key
– Transfers the standby and active COM frequencies. Pressing and holding this
key for two seconds automatically tunes the emergency frequency (121.5 MHz) in the active frequency field.
9
COM
VOL/SQ Knob
– Controls COM audio level. Audio volume level is shown in the field as a percentage.
Pressing this knob turns the COM automatic squelch ON and OFF.
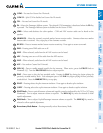
10
Direct-to Key
– Allows the user to enter a destination waypoint and establish a direct course to the selected
destination (specified by the identifier, chosen from the active route, or taken from the map pointer position).
11
FPL Key
– Displays the active Flight Plan Page for creating and editing the active flight plan, or for accessing
stored flight plans.
12
CLR
Key (DFLT MAP)
– Erases information, cancels an entry, or removes page menus. To display the Navigation
Map Page immediately, press and hold
CLR
(MFD only).
13
Dual FMS Knob
– Press to turn the selection cursor ON/OFF.
Data Entry: With the cursor ON, turn to enter data in the highlighted field (large knob moves cursor
location; small knob selects character for highlighted cursor location). When the cursor is turned ON
while viewing the Active Flight Plan Page, the cursor is placed on the line below the Data Insertion Pointer
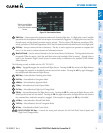
see Figure 1-4. The pointer indicates data entered at the cursor will be inserted above the line selected.
Scrolling: When a list of information is too long for the window/box, a scroll bar appears, indicating more
items to view. With cursor ON, turn large knob to scroll through the list.
Page Selection: Turn knob on MFD to select the page to view (large knob selects a page group; small knob
selects a specific page from the group)
14
MENU Key
– Displays a context-sensitive list of options. This list allows the user to access additional features,
or to make setting changes that relate to certain pages.