


Contact management 567
Setting No Reply Needed
The No Reply Needed command tags an email, SMS, or fax contact with No Reply Needed or Junk Mail. If an
agent receives an email, SMS, or fax from a customer and no response is required, the agent can tag the
contact with No Reply Needed. The No Reply Needed tag enables you to generate reports showing the
contact as having been received, but not requiring a response. If an agent receives an email, SMS, or fax from
an unsolicited sales organization, the agent can tag the contact with Junk Mail. The system removes contacts
tagged with Junk Mail from the ACD Calls Offered and ACD Calls Handled pools so they are excluded from
the reports.
Viewing a client’s history
The Client history tab displays a client’s contact history.
Creating and using Multimedia Contact Center templates
You can create a folder of response templates (standard company responses to frequently asked questions).
You can use templates to optimize productivity, reduce response times, and ensure quality with uniform
responses when you reply to email, SMS, and chat contacts.
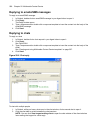
Creating templates
To create a template
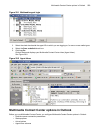
1. In Outlook, click the Folder List button below the left pane to view a list of Outlook folders.
2. Expand the Public Folder list, right-click All Public Folders, and select New Folder.
The Create New Folder window opens.
3. Under Name, type Multimedia Contact Center templates.
4. Click OK.
The Multimedia Contact Center templates folder opens in the All Public Folders, folder.
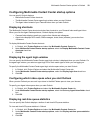
5. On the toolbar next to New, click the down arrow.
6. Select Post in This Folder.
The Untitled - Discussion window opens.
7. After Subject, type the name of the queue for which you are creating the template (for example, type
Support).
8. Type a response in the template.
9. Click Post.
Using templates
To select a template and reply to a contact
1. In Outlook, select your Agent Inbox and double-click an unanswered contact to select it.
2. Click Reply.
The Reply window opens.
3. Click Select Template.
4. Click the Folder List button below the left pane to view a list of Outlook folders.
5. Expand the Public Folder list, click All Public Folders, and click Multimedia Contact Center
templates.
6. Under Multimedia Contact Center templates, double-click a template to select it.
The template information opens in the body of your message.
7. Type any additional information required.
8. Click Send.