


524 Chapter 18 Workforce Scheduling
Configuring the time format
There are two time formats you can select from: the 24 hour international format or the 12 hour format which
uses A.M. and P.M. to indicate morning and afternoon. For example, 3 o’clock in the afternoon appears as 15
if you select the 24 hour time format or 3 P.M. if you select the 12 hour time format.
To configure the time format
1. On the application menu, click Preferences.
2. Click the General tab.
3. After Hour format, select either 12 hours or 24 hours.
4. Click OK.
Configuring tool tip display
You can specify the following information in tool tips for shifts, jobs, breaks, time off events, unavailable
periods, and shadow events:
• Schedule name—provides the name of the schedule in which the event appears.
• Is recurring—displays if the event recurs.
• Type—provides the name of the event.
• Type name—states if the event is a shift, job, break, time off event, unavailable period, or shadow
event.
• Start/End Time—provides the start and end time of the event.
• Event Notes—provides any notes from the detail grid for the event.
To configure the tool tip display
1. On the application menu, click Preferences.
2. Click the Display tab.
3. Under Tool tip display, select the check boxes for the tool tips to display.
4. Click OK.
Configuring warnings
Warnings notify you when you try to schedule events outside of your scheduling parameters.
You can set the following warnings:
• Schedule warnings
• Shift warnings
• Break warnings
• Job warnings
• Overtime warnings
• Time Off warnings
• Employee warnings
• Schedule Builder warnings
• Employee selection warnings
To configure warnings
1. On the application menu, click Preferences.
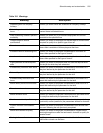
2. Click the Warnings tab.
3. Ensure the check boxes of the warnings you want to configure are selected.
See Table 18-1.
4. Click OK.