INSTALLING A
MODULE
“On-Line Module Swap” on page 4-7 and be sure
to follow the procedures exactly.
In a system without the On-Line Module Swap feature,
turn the power off in the following sequence before
installing or removing a module:
1
2
3
4
Turn the power off at the Power Supply Module on the
basic carrier.
If there is an Auxiliary Power Unit, turn it off.
If there is an expansion carrier, turn the power off at
the Power Supply Module there.
If there is an Auxiliary Power Unit on this Power
Supply Module, turn it off.
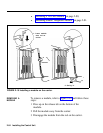
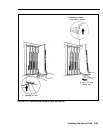
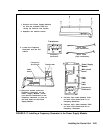
The following instructions apply when installing any
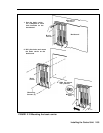
module. Refer to Figure 2-15 and follow these steps:
1
2
Lower the module onto the rod on the carrier at the
appropriate slot. Ensure that the connector on the
module mates properly with the connector on the
carrier.
Gently push the module into the carrier until it locks
into place.
Ensure that the connector on the module mates properly
with the connector on the carrier.
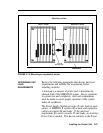
For instructions on installing specific modules, see the
appropriate discussion as follows:
●
“Installing the Power Supply Module” on page 2-66
●
“Installing the Feature Module on the Processor
Module” on page 2-73
●
“Installing Line and Station Modules” on page 2-79
Installing the Control Unit 2-63


