


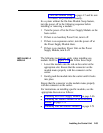

MOUNTING THE
EXPANSION
CARRIER
To
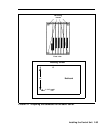
attach the expansion carrier to the backboard and to the
basic carrier, refer to Figure 2-13 and follow these steps:
1
2
3
4
5
6
7
8
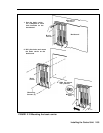
Locate the breakaway plastic tab on the right side of
the basic carrier. Use a flat-bladed screw driver to
gently pry the tab open until it snaps free.
Engage the connector of the expansion carrier with the
card extender on the basic carrier.
Make sure that the expansion carrier is properly
aligned with the basic carrier.
Use the expansion carrier as a template and mark the
screw hole locations on the backboard.
Remove the expansion carrier.
Drill holes and insert screws as you did for the basic
carrier.
Mount the expansion carrier on the screws through the
mounting bosses. Slide it to the left and reconnect the
card extender of the expansion carrier to the connector
on the basic carrier until it is completely engaged.
When the carriers are completely engaged, tighten the
screws.
2-56 Installing the Control Unit