


Labeling Jacks and
Boxes
3
4
5
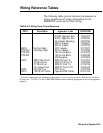
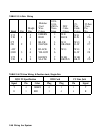
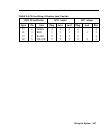
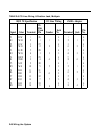
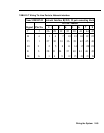
Depending on the kind of line wiring, follow the order
and color codes listed in Table 2-4, “CO Line Wiring,
6-Position Jack, Single-Pair,” Table 2-5, “CO Line
Wiring, 6-Position Jack, Two-Pair,” and Table 2-6,
“CO Line Wiring, 6-Position Jack, Multipair” on pages
2-46 through 2-48. Place the colored wires in the
grooves on the connector of the adapter. Continue
placing wires in grooves on each adapter until you
have attached a pair of wires for each outside line. If
you have the maximum of 56 lines, for example, you’ll
need 14 adapters for each set of four outside lines.
Align the two plastic caps over the grooved connector
now holding the colored wires, and push the caps
down until they snap into place.
If the caps did not trim the wires when you snapped
them down onto the block, trim the ends of the wire
protruding from the grooves with a pair of scissors or
diagonal pliers. When you're finished, none of the
wires should extend far enough beyond the plastic caps
to touch each other.
Follow these instructions to label jacks and boxes:
1
2
3
Locate the green label sheet that came with the
apparatus box, the telephone number directory, jack-
identifier label strips, and labels for the apparatus box
and the line jacks.
On the telephone number directory, fill in the
telephone numbers for the outside lines in the order in
which they appear at the network interface or on the
list provided by the local telephone company.
Using the telephone number directory as a guide, label
the jacks in the apparatus box with the appropriate line
jack labels.
Wiring the System 2-43