


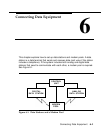

Installing the PC, CAT, or Printer
9.
10.
11.
12.
13.
14.
15.
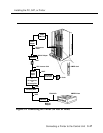
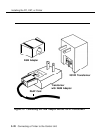
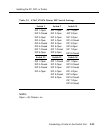
Plug the other end of the D6AP cord into the 2012D-50M transformer.
NOTE:
If you are working with a 248B adapter and 2012D transformer
instead of a 2012D-50M transformer, plug the D6AP cord into the
jack on the 248B adapter, and then connect the spade-tip wires on
the 248B adapter to the screws on a 20120 transformer
(see Figure 5-5).
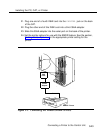
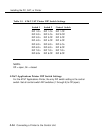
Plug the 400B2 adapter into a wall jack, BR1A-4P adapter, 102
connecting block, or 103 connecting block.
If the 400B2 is plugged into a wall jack, make sure that building wiring
has been set up so that the control unit-side wall jack communicates
with the printer-side wall jack.
If the 400B2 is plugged into a BR1A-4P adapter, 102 connecting block,
or 103 connecting block, use 4-pair plug-ended cable to connect the
BR1A-4P adapter (or connecting block) to the printer-side wall jack.
On the printer side, plug one end of a D8W cord into the wall jack and
the other end into the
WALL
jack on the Z3A2 ADU.
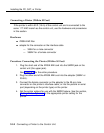
Connect one end of an EIA-232-D cable to the 25-pin male connector
on the Z3A2 ADU and the other end to the parallel or serial port
(depending on the printer type) of the printer.
Plug the 2012D-50M (or 2012D) transformer into a wall outlet.
Set the printer options for use with the SMDR feature. See the section,
“Setting Printer Options,” for the appropriate printer setting for the
printer.
Connecting a Printer to the Control Unit
5-19