


Installing the PC, CAT, or Printer
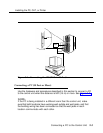
Procedure: Connecting a CAT and Printer on the Same AC Outlet
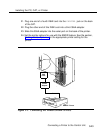
1. Plug the short end of the Z200A EMI cord into the SMDR jack on the
control unit (the upper jack).
2. Plug the other end of the Z200A EMI cord into the SMDR jack on the
back of the CAT.
3. Plug one end of a D8W cord into the PRINTER modular jack on the
back of the CAT.
4. Plug the other end of the D8W cord into a 355A adapter.
5. Slide the 355A adapter into the serial port on the back of the printer.
6. Set the printer options for use with the SMDR feature. See the section,
“Setting Printer Options,” for the appropriate printer setting for the
printer.
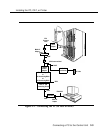
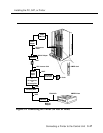
Connecting a CAT and Printer on a Different
AC Outlet
If the printer is an AT&T CAT serial printer and is either not grounded to the
same AC outlet as the control unit or CAT, or is more than 50 ft (15 m) from
the control unit, follow the procedures in this section.
NOTE:
If the printer is being installed in a different robin than the control unit,
make sure that both locations have working wall outlets and wall jacks,
and that the building wiring has been connected so that the wall jacks in
each location communicate with each other.
5-10 Connecting a Printer to the Control Unit