1 PURPOSE
1 .OI
The purpose of this programming section is to
provide the system installer with instructions to set
the detailed feature configuration and operation of
the system.
1.02
This chapter provides an overview of the
programming section, its organization, and its
general programming instructions.
1.03
For easy reference, every paragraph is
numbered.
2 ORGANIZATION
2.00 This programming section is
organized in
modular chapters. The chapters are titled as fol-
lows:
2.10 Chapter One-
Introduction (Section 200-
096-301):
Begins with an overview of the section’s
purpose and organization. Also included are basic
instructions on how to program the system with a
20-button LCD digital or electronic telephone, some
general programming notes, and a description of
system initialization.
2.20 Chapter Two-System Record Sheets and
Instructions (Section
200-096-302): Provides a
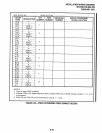
record sheet for every program (00 W 97), including
toll restriction and least cost routing, and instructions
on how to fill them out. The system programmer
programs the system from the data on the record
sheets. Program cross-referencetables in numerical
and alphabetical order are also included.
3 GENERAL PROGRAMMING
INSTRUCTIONS
3.01 General Programming Instructions provide
an overview of system programming considera-
tions. Data is entered from System Record Sheets
at the 20-button LCD digital or electronic telephone
connected to port 05. System Record Sheets docu-
ment a specific system’s data configuration, includ-
ing attributes of a feature or group of features. The
record sheets are organized by program number.
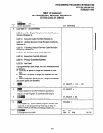
3.10 Programming Data Entry Overview
3.11
Keystrokes for entering data from System
Record Sheets follow a pattern, consisting of a
PROGRAMMING PROCEDURES-INTRODUCTION
SECTION 200-096-301
FEBRUARY 1991
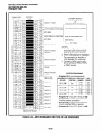
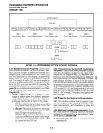
5step process described below, and illustrated in
Figure
l-l. Button (key) sequences that stay the
same for every program are abbreviated, and
shaded.
Button sequences that are unique for
every program are white.
1)
2)
3)
4)
5)
In step 1, enter Programming Mode by pressing
aseriesof buttons. See Figure l-l.
Tosavespace
on the recordsheets, abbreviation “‘A”is used to
denote the beginning sequence.
“A” buttons are
shaded.
In step 2, enter the Program Number. This
sequence is unique for every program. The
buttons are white, and never abbreviated.
In step 3, enter Program Data. Again, this se-
quence is unique for every program. The buttons
are white and never abbreviated. To make an-
other entry, repeat step 3 until ready to exit the
current program.
In step 4, exit the current program. This se-
quence never changes. To save space on the
record sheets, abbreviation “Z” is used to de-
note the ending sequence (as in “Z” of “from A to
Z”). “Z” buttons are shaded. Upon exiting the
current program, repeat step 2 to enter another
program, or continue with step 5 to exit program-
ming mode entirely.
In step 5, exit Programming Mode by pressing
the same buttons as in step 4. This sequence
also never changes.
3.12 Each System Record Sheet has the abbrevi-
ated button sequence shown in Figure 1-I for its
program illustrated at the top of the sheet.
3.20 Programming Data Variations
3.21
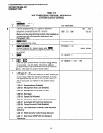
There are two different ways to enter data in
step 3 of a program: pressing the buttons on the
dialpad, and pressing the LED buttons. Many pro-
grams are multidimensional, and involve both types
of entry.
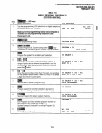
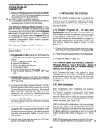
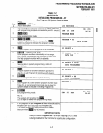
3.22 Simple Programs:
Simple programs, such
as
Program
33, only require data to be specified
through the dialpad. Data entered from the dialpad
displays on the programming electronic or digital
telephone’s LCD, along with prompts and confir-
mations. See Table 1 -A for step-by-step data entry
instructions for
Program 33.
l-l


