Removing the Control Unit Housing
Removing the Control Unit Housing
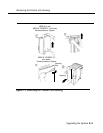
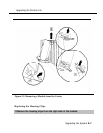
Remove the control unit housing as described below. See Figure 9-1.
■
For a MERLIN II or a MERLIN LEGEND (Release 2.1 or later)
Communications System:
1. Remove the front housing from each carrier by pulling the bottom-
front towards you, and lifting it up as shown in Figure 9-1.
2. Remove the top from each carrier in the system by pushing it
straight up from the front.
3. Do not discard the housing unless new housing is provided. You will
reassemble the housing when installation is complete.
■
For a MERLIN LEGEND (Release 2.0 or earlier) Communications System:
1.
2.
3.
4.
5.
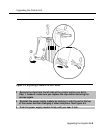
From both sides of the control unit, pry the clips free from the
housing, using a screwdriver if they are difficult to reach.
Carefully pull the housing towards you.
If the system has more than one carrier, make sure you remove the
housing only from the basic carrier side, otherwise the housing may
disassemble.
If the housing clips need to be replaced, follow the procedure in
“Replacing the Housing Clips.”
Discard the housing only if upgraded housing has been provided.
9–2 Upgrading the System


