


176 Chapter 12 Installing the Companion system
P0993298 02
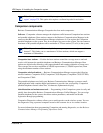
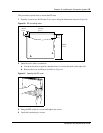
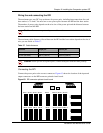
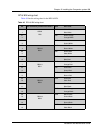
5 Feed the power cord through the bottom of the RPI and route it through the clip and around the
strain relief support. Figure 62 shows how to route the power cord.
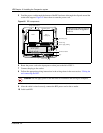
Figure 62 RPI components
6 Route the power cord to the input power socket just to the left of PSU 1.
7 Connect the plug to the socket.
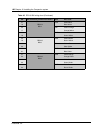
8 Follow the appropriate wiring instructions in the wiring charts in the next section, “Wiring the
and connecting the RPI”.
9 After the cable is wired correctly, connect the RPI power cord to the ac outlet.
10 Label each RPI.
Caution: Do not apply power to the RPI until its installation and wiring are complete.
PSU 1 PSU 2
(if equipped)
Up to 16 outputs
(TCM + power)
Up to
16
inputs
(TCM)
Connection board
Jumper lead to PSU 2
Power cord
Grounding strap
Power supply cabling
Strain relief support
Clip
Grounding plates
Ferrite rings
The RPI-8 has grounding straps and
plates fitted to allow an upgrade to
an RPI-16.