


Chapter 5 Installing the BCM1000 105
Installation and Maintenance Guide
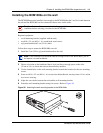
Installing the BCM1000 on the wall
To mount the BCM1000 on the wall, you need:
• two rack mounting brackets or a wall-mount bracket kit
• four #10 x 2.5 cm (#10 x 1 in.) round head wood screws
• a plywood backboard 2 cm (3/4 in.) thick
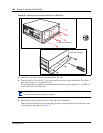
Follow these steps to install the bracket:
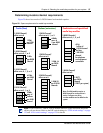
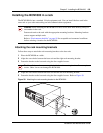
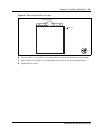
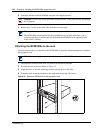
1 Align the screw holes on one side of the base unit with both rack mounting brackets or with
one of the wall mounting brackets.
2 Fasten the bracket to the base unit using the screws provided with the bracket. Refer to Figure
32.
Caution: Refer to “Environment checklist” on page 99 for acceptable environmental
conditions before selecting a location for the BCM1000.
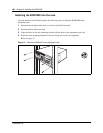
Note: You may use the two rack mounting brackets to do a wall installation. Or you can
order a wall-mount kit, which contains a bracket that runs the entire length of the base
unit. Refer to Figure 32.
Note: The brackets suspend the BCM1000 on the wall. Consider the direction you want
the media bay modules to face, left or right, when you choose the side to install the rack
mounting brackets on.
Caution: Use only the screws supplied with the rack mounting brackets. Do not replace
screws. Other screws can damage the BCM1000.