


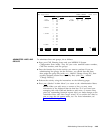
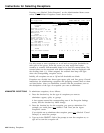
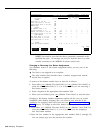

zET OPTIONS
To set options, press the function key for the option you want to change.
[ F1 ] Service Level. The service level is the percentage of calls connected to
agents within a specified number of seconds (the service level limit).
Prompt:
SERVICE LEVEL: Percent of Calls Answered
within n seconds. n: _
Action: 1 Enter a number 1 through 999.
2 Press
[ F8 ] (labeled “Enter Data”).
[ F2 ] Abandon Thresh. Sometimes a call is transferred to an agent even
though the caller has disconnected (abandoned the call). This threshold sets
the limit for the shortest amount of time that a call must be handled in order
for it to be counted as processed call. Calls that do not last as long as the
time specified are counted as abandoned, assuming the caller disconnected
before the call reached the agent.
Prompt:
ABANDON THRESHOLD: Seconds: _
Action:
1 Enter a number 1 through 99.
2 Press
[ F8 ] (labeled “Enter Data”).
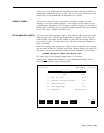
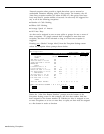
[ F3 ] Alarm On/Off. You can choose to have your PC beep every time an
exception message, system message, or error message appears. Press
[ F3 ]
(labeled “Alarm On/Off”) to change the setting that appears in the Audible
Alarm field on your screen.
In this field, On means the PC beeps, and Off
means the PC doesn’t beep. Initially, the alarm is on.
[ F4 ] DelayMsg Length. Each time you record a new delay message, you
should time the message and enter the number of seconds in this field.
Prompt:
SET DELAY MESSAGE LENGTH: Seconds:_
Action:
1 Enter a number 1 through 99.
2 Press
[ F8 ] (labeled “Enter Data”).
[ F5 ] Business Name. You can enter the name of your business (up to 20
characters) in this field and it will appear on all CMS screens and reports.
You can use both upper and lower case letters. The system does not,
however, accept the space character. Use the underscore character (“_” ) to
designate a space.
Prompt:
ENTER BUSINESS NAME
Action:
1 Enter a business name, maximum of 20 characters.
2 Press
[ F8 ] (labeled “Enter Data”).
[ F8 ] Admin Menu. Press [ F8 ] (labeled “Admin Menu”) to return to the
Administration Menu screen.
4-30 Setting Options