


[ F1 ] Add Line. Use this function key to add a line to CMS and assign it to a
line group.
IMPORTANT: Before adding a line to CMS, you must first assign the
line to the PC. For information on how to do this, see “Assign Lines
to the CMS PC” in the MERLIN II Communications System Getting
Started Guide for the Call Management System.
This procedure also affects the CU1 and CU2 port assignments to the
CMS PC. Have the MERLIN II system administrator check that both
CU1 and CU2 attendant port assignments are exactly the same and
assigned in the same order.
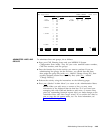
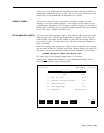
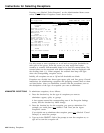
Prompt:
ADD LINE: Button #:
_ Line ID: Group Letter: _
Action: 1 Enter the button number you want to assign to the line. It
must be a number from 1 to 32 that is not already assigned to
another CMS line.
2 In the Line ID field, enter the last four digits of the telephone
number or some other identifier (up to 5 letters or numbers)
such as WATS1 or WATS2.
3 Enter. the letter (A through D) for the line group to which you
are assigning a line.
4 Press
[ F8 ] (labeled “Enter Data”).
[ F2 ] Remove Line.
Use this function key to remove a line from CMS. To
help you avoid removing a line by accident, CMS prompts you to confirm
your request.
NOTE: When removing lines from the CMS PC, make sure you
update your CMS Line Button Planning Form and your MERLIN II
System Configuration Form, so you know which line buttons are
available for future use.
Prompt:
REMOVE LINE: Line ID:
Action: 1 Enter a line ID and press [ F8 ] (labeled “Enter Data”).
2 When the confirmation prompt appears, type y to confirm
your request or n to deny it, and press
[ F8 ] (labeled “Enter
Data”).
[ F3 ] Move Line. Use this key to shift a line from one line group to another.
Prompt:
MOVE LINE: Line ID:
New Group Letter:_
Action:
1 Enter a line ID.
2 Enter a line group letter.
3 Press
[ F8 ] (labeled “Enter Data”).
4-26 Administering Lines and Line Groups