


113
5
2.
Press
MENU
, select DATA DELETION then press
ENTER
.
A submenu appears.
3.
Select SELECTED OUTLINE then press
ENTER
.
A confirmation message appears asking if you are sure you
want to delete the outline.
4.
Press
Y
(or
N
to cancel the deletion).
You can also delete an outline by pressing
DEL
in
Index mode.
Deleting all outlines
1.
In Index or View mode press
MENU
, select DATA
DELETION then press
ENTER
.
A submenu appears.
2.
Select ALL OUTLINES then press
ENTER
.
A confirmation message appears asking if you are sure you
want to delete all outlines in the application.
3.
Press
Y
(or
N
to cancel the deletion).
☞ It is not possible to delete all outlines simultaneously
if the Organizer is locked. See p.186.
Using subtopics (children)
The examples used so far have only contained one level of
topics (excluding the title, which is always on the first level
by itself). This simple outline form may be all you need to
organize your information. You can, however, create
subtopics for greater flexibility. Each subtopic belongs to
the particular topic that is on the next level above it. A
subtopic can, in turn, have its own subtopics: these can
continue for 15 levels below the title. Subtopics are referred
to as children, the topic they belong to as the parent, and
parents and children together as a family.
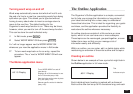
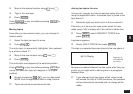
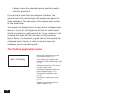
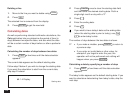
The example below shows an outline illustrating these
points.
#5-2-8 Display
The hollow diamond indicates that the topic is a parent (has
subtopics) while a solid diamond indicates that the topic
has no children. This is useful because a topic’s children
may be hidden from view.
You can create a subtopic by pressing
'
before creating
or moving a topic. The new subtopic will be a child of the
topic directly above it. If you decide to reorganize an outline
later, you can promote a subtopic to the same level as its
Title
Parent
Children