


System & Station
Program 17 – DID/Tie Line Options
3-50 Strata DK Programming 5/99
Program 17 – DID/Tie Line Options
Processor Type:
DK40i, All RCTUs
Program Type:
System
Initialized Default:
LED 01/02 OFF, LED 03/04 ON
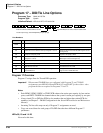
Program 17 Overview
Program 17 assigns lines for Tie and DID operation.
Important! When normal Tie/DID lines are configured with Program 71 and 72 DNIS
assignments, turn LED 05 ON and LED 06, 07 and 08 OFF for those lines - then
program the lines as required in Programs 71 and 72.
Notes
● Each REMU, PEMU, RDDU or TDDU PCB reduces the station port capacity by four station
ports, each RDTU Tie/DID line channel reduces the system’s station port capacity by one port.
● Always install Tie or DID line PCBs in slot numbers that are higher than station PCB slot
numbers (see Chapter 2 – DK40i Configuration in the Strata DK Installation and Maintenance
Manual).
● Incoming Tie line calls camp-on only if Program 71 assignments are used.
● Copy one record sheet for each group of Tie/DID lines that have different Program 17
parameters.
LEDs 09, 10 and 14~20
Not used at this time.
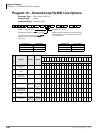
Line Numbers:
LED/Button X LED ON LED OFF
09, 10, and
14~20
Not used at this time.
08 DID/Tie line DTMF digits with
tones DID/Tie line DTMF digits without
tones
07
DID/Tie line receives ANI and routes per Programs 71 and 72 DID/Tie line does not receives ANI (DID Program *09 and
Tie Program 04)
06 Telephone LCD priority is ANI Telephone LCD priority is DNIS
05
DID/Tie line routes per DNIS assignments:
(Programs 71 and 72)
DID/Tie line routes per Non-DNIS assignments:
(DID Program *09 and Tie Program 04)
04 DID/Tie no second dial tone DID/Tie second dial tone
03 DID line Auto Camp-on busy DID line no Camp-on busy
02 Wink Start for Tie or DID Immediate Start for Tie or DID
01
Page and Voice Announce on incoming Tie line Page access for
Tie/DID DNIS lines
No Page and Voice Announce on incoming Tie line No
Page access for Tie/DID DNIS lines
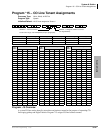
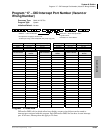
Enter Line No. that will be DID or Tie line.
To add a port range, enter XXX
XXX (low port
high
Light LED Buttons 01~08 as noted in table below