


22
SX-200 ICP MX Technician’s Handbook
Quick Installation
You can quickly install a system configured with Business Option 1 if your
installation does not require any purchasable MOSS Options or optional
controller hardware.
If you are adding MOSS Options, complete the installation by enabling the
options in CDE Form 04, System Options/System Timers. For more
information, see, “Enabling MOSS Options” on page 86.
If you have optional controller hardware to install, follow the procedure on
page 31.
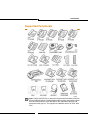
To install a basic system:
1. Mount the controller.
2. Connect the ground lug at the back of the controller to a ground
connection.
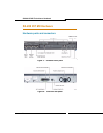
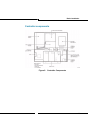
3. Connect the hardware:
- Connect an Ethernet Switch to the Controller’s Ethernet port with a
Cat 5 cable.
- Connect the IP phones to the Ethernet Switch ports using Cat 5 cable.
- Connect a breakout box to the amphenol connector at the back of
the controller. For amphenol connector Onboard Analog/DNIC Tip
and Ring Assignments, see page 367.
- Connect the LS CLASS lines and any ONS and DNIC phones to
the breakout box.
- Connect a Music on Hold source, Pager, Night Bells, and any other
optional devices to the back of the controller; see pages 72-74 for
details.
4. Power up the controller.
• The Alarms LEDs on the controller flash and the IP Phones display
IP addresses.
Note: Premier Business systems use the Premier database which must be
installed before enabling the MOSS Options. For more information, see
“Installing an Alternate Database” on page 205.
Note: The Ethernet port on the controller is auto-sensing, allowing you to
use either a crossover or a straight-through cable.