


4-5
Cisco Unified IP Phone 8961, 9951, and 9971 Administration Guide for Cisco Unified Communications Manager 8.5 (SIP)
OL-20861-01
Chapter 4 Setting Up the Cisco Unified IP Color Key Expansion Module
Key Expansion Module Settings on the Phone
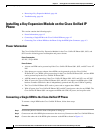
Note If the Side USB Port is disabled, the KEM will not work.
Step 5 Be sure to select the phone button template (in the Device Information portion of the Phone
Configuration window) that has been configured to make full use of the KEM(s) attached to the phone.
Step 6 Click Save.
Key Expansion Module Settings on the Phone
Once you have installed one or more KEMs on the phone and have configured them in Cisco Unified
Communications Manager Administration, the KEMs are automatically recognized by the Cisco Unified
IP Phone 8961, 9951, and 9971.
On the phone, press the Applications button and then press Accessories. All KEMs that have been
properly installed and configured should appear in the list of accessories.
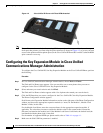
When multiple KEMs are attached, they will be numbered according to the order in which they are
connected with respect to the phone. For example (refer to Figure 4-2):
• Key Expansion Module 1 is the KEM closest to the phone.
• Key Expansion Module 2 is the KEM in the middle.
• Key Expansion Module 3 is the KEM farthest to the right.
You can select a KEM, and then choose one of the following softkeys:
• Exit—Returns to the Applications menu.
• Details—Provides details about the selected KEM.
• Setup—Allows you to configure the brightness of the selected KEM. This can also be done by means
of the Preferences menu. For details, refer to the Cisco Unified IP Phone 8961, 9951, and 9971 User
Guide for Cisco Unified Communications Manager, “Accessories” chapter, “Adjust the Brightness
on the Cisco Unified IP Color Key Expansion Module” section.
Upgrading the Key Expansion Module
To automatically upgrade KEMs to the latest load, follow these steps:
Procedure
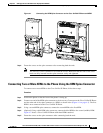
Step 1 Power on the KEM, press Page 1, and do not release. When the LCD turns white, continue pressing Page
1 for at least one second.
Step 2 Release Page 1; LEDs should turn red. Immediately press Page 2 and continue pressing Page 2 for at
least one second.
Step 3 Release Page 2; all LEDs should turn amber.
Step 4 Press Lines 5, 14, 1, 18, 10, and 9 in sequence.
The LCD should turn blue, and the spinning loader is displayed in the center.