


Voicemail Pro Installation and Maintenance Page 34
15-601063 Issue 22e (16 May 2010)IP Office Release 6
2.3 Upgrading Voicemail Pro
This section describes how to upgrade Voicemail Pro. The options available are:
· Upgrading from Voicemail Lite
· Upgrading from below Voicemail Pro 3.2
· Upgrade from 3.2 or higher
2.3.1 Upgrade from below version 3.2
It is important that the settings of an existing Voicemail Pro are exported before any upgrade. Although folders that
contain prompts and messages are not affected by the upgrade process, the editable version of a customer call flow is
lost.
To upgrade from below version 3.2 to version 4.x+:
1.
Export the Database
Before removing Voicemail Pro as part of an upgrade, you must create a backup copy of the call flow database. This will
contain any customizations made to the default call flow.
1.
Start the Voicemail Pro Client.
2.
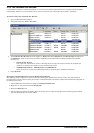
From the File menu, select the option Import or Export.
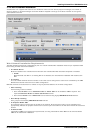
3.
Select the option Export call flows and click Next.
4.
Enter a file path and file name ending in .mdb, for example C:\temp\backup.mdb. Click Next.
5.
Click Finish to start the export then click Close to complete the export procedure.
6.
Close the Voicemail Pro Client.
2.
Back up the Registry
Any registry settings that are associated with Voicemail Pro need to be backed up.
1.
Insert the IP Office Applications DVD. Click on the link for Voicemail Pro and then double-click on setup.exe.
The Choose Setup Language window opens.
2.
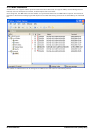
Right-click the DVD drive and select Open.
3.
Locate the file backupreg.bat and double-click it to run the application.
4.
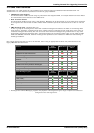
Check that the registry settings have been backed up. The batch file should have created 3 backup files in the
Windows Temp directory. Make sure that the following 3 files exist in that location:
· VMPro.arf
· NetAly.arf
· IMSGateway.arf
3.
Remove Voicemail Pro
Any previous versions of Voicemail Pro must be removed before you start to install the new version.
1.
Open the Windows Control Panel.
2.
Select Add/Remove Programs.
3.
Select IP Office Voicemail Pro and click Add/Remove.
4.
From the options offered, select Remove and click Next.
5.
Follow the prompts that you see on the screen during the removal process.
6.
When the process has been completed, select the option Yes, I want to restart my computer now and click
Finish.
4.
Restore the Registry
The Voicemail Pro registry settings that were backed up in step 2 needs to be restored.
1.
Insert the IP Office Applications DVD. Click on the link for Voicemail Pro and then double-click on setup.exe.
The Choose Setup Language window opens.
2.
Locate the file restorereg.bat and double-click it to run the application. This restores the registry settings previously
associated with Voicemail Pro.
5.
Install the New Software
See Installing Voicemail Pro and then refer to the sections that relate to the type of Voicemail Pro that you intend to
install.
36
34
35
18