


Voicemail Pro Installation and Maintenance Page 28
15-601063 Issue 22e (16 May 2010)IP Office Release 6
To install the Voicemail Pro software components:
1.
Insert the IP Office Applications DVD. Click on the link for Voicemail Pro and then double-click on setup.exe.
2.
The Choose Setup Language menu is displayed. This language is used for the installation process and does not
affect the language prompts that are installed.
3.
Select the language for the installation process. Click OK.
4.
The Preparing Installation menu is displayed.
· Voicemail Pro requires Microsoft .NET 2.0 Framework. If this is not detected, you will be prompted to install it.
Click Yes to install Microsoft .NET 2.0 Framework.
· If the Modify, repair or remove the program window appears you need to follow the upgrade process .
5.
The Welcome window is displayed. Click Next.
6.
The Customer Information menu is displayed.
· Use the default names or enter a user and company name. These settings do not affect the Voicemail Pro
installation.
· Select the option Anyone who uses this computer (all users).
· Click Next.
7.
The Choose Destination Location menu is displayed. Unless specifically required, for ease of maintenance use
the proposed folder location. Click Next.
8.
The Messaging Components menu is displayed.
9.
Select Voicemail Pro (Full) or Voicemail Pro Client - Only. Click Next. If Voicemail Pro Client - Only was
selected, go to step 14.
10.
The Setup Type menu is displayed. Select Compact, Typical or Custom and click Next.
· If the option selected was Custom, the Select Features menu is displayed. Select the components required
for the installation and click Next.
11.
The Service Account Name menu is displayed. This window is used to select the account under which the
Voicemail Pro services will be run following installation.
· Enter the user name and password of the account to use. Alternatively, click Browse and select a name from
the list of available PC or network accounts.
· Click Next. The account name and password are validated. If the validation fails you whether you want to
create a new account that matches the details entered.
12.
The Select Program Folder menu is displayed. By default, the program folder for the Voicemail Pro client is set
to IP Office. For ease of maintenance use this option unless there is a specific reason to use a different folder. Click
Next.
13.
The Start Copying Files menu is displayed. It shows a summary of the components that are about to be
installed. Check that this list is as expected. If for any reason the details are not what you expect, click Back and
make the necessary changes. When you are satisfied that the details are correct, click Next to start copying the
files.
14.
The Setup Status menu is displayed. This shows you the progress of the file installation. For a client only
installation, the software installation process is now completed.
15.
The InstallShield Wizard Complete menu is displayed.
16.
Depending on the operating system and the components installed you may be prompted to restart the computer.
If so select Yes, I want to restart my computer now.
17.
Click Finish.
18.
If necessary, the computer will restart and you will need to log in to continue the installation process. If otherwise,
the installation process continues without restarting.
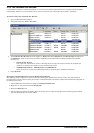
19.
The installation process continues by requesting a number of configuration settings used by the voicemail server
services,
1.
The IP Office Voicemail Pro Email Settings window is displayed. This is used to enter the account that the
voicemail pro server should use for email functions. Enter the name of the email account to use or click
Browse and select an account to use. Click Next.
2.
The IP Office Voicemail Pro SMTP Email Settings window opens.
3.
In the Mail Server box, type the name of the SMTP mail server or use the name that is proposed. This should
be the fully qualified domain name.
4.
In the Port Number box, type the number of the receiving port on the SMTP mail server. The default is 25.
34