


Voicemail Pro Installation and Maintenance Page 170
15-601063 Issue 22e (16 May 2010)IP Office Release 6
4. Voicemail Pro Actions
When a start point has been added, it can be linked to an action. Each action can have one or several results,
depending on the type of action, and each result can be linked to a subsequent action. In this way you can build up a call
flow.
Each action can have a number of results (true, false, no answer, busy). The types of results depend of the type of action,
most actions having just a 'Next' result. Each result can be used as a connection point to another action. See Connections
.
A set of actions and connections can be combined and reused as a module. Modules are reusable sets of actions. They
allow you to create a sequence of actions that you can then use within any other start point's call flow. Changes to the
module will affect all start points using that module. This simplifies the programming if a number of start points need the
same sequence of actions.
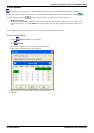
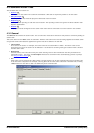
You can double-click an action to display the properties in a series of tabs. Many actions share the same standard tabs but
each usually also has a specific tab that contains options unique to that action's function.
The standard tabs of an action are:
· General
Set a name for the action in the call flow and whether a PIN code is required by callers to use the action.
· Entry Prompts
Sets the prompts that should be played to callers that reach the action.
· Reporting
Use to provided reporting on calls that use the action. The reporting is done through the IP Office Customer Call
Reporter applications.
· Results
Displays the results configured for the action. Each result can be connected to a further action in the call flow.
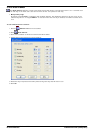
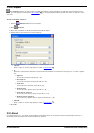
To add an action:
1.
Select the start point to which you want to add an action.
2.
Click in the Details pane.
3.
Click Actions and select the type of action that you want to add from the list, for example Basic Actions.
4.
From the submenu, select the required action. For example, if you selected Basic Actions, you might choose Speak
Text. The cursor changes to show that you have selected an action to add. Alternatively on the toolbar, click the
icon for the required type of action and then select an action from the submenu.
5.
Click in the details pane, where you want to place the action. The new action is added. You can now edit the action
and add connections to it.
You can change the properties of an action. For example, If you selected the Speak Text action you can specify the actual
text to be spoken when an action is taken.
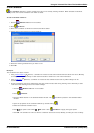
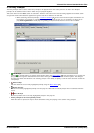
To edit an action:
1.
Double-click the action in the details pane or right-click it and select Properties. The Properties window opens.
Details of the selected action are contained in a set of tabs.
2.
Select a tab and change the action properties as required.
3.
Click OK when you have finished.
To delete an action:
1.
In the Details pane where the actions are displayed, click the action to delete.
2.
From the Edit menu, select Delete or right-click the action and select Delete.
3.
The selected action is deleted.
150
171
159
176
177
182
183