


91
Note 1)
When setting the line address from the remote controller, do not use address 29 and 30.
The address 29 and 30 cannot be set up in the outdoor unit. Therefore if they are incorrectly set up, a check
code [E04] (Indoor/outdoor communication circuit error) is output.
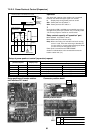
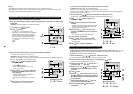
Confirmation of indoor unit address and position by using the remote controller
[Confirmation of indoor unit address and the position]
1. When you want to know the indoor address though position of the indoor unit itself can be
recognized;
<Procedure> (Operation while the air conditioner operates)
1
If it stops, push
ON / OFF
button.
2
Push
UNIT
button.
The unit No. 1-1 is displayed on the LCD.
(Disappears after several seconds) The displayed
unit No indicates the line address and indoor
address. (If there is other indoor unit connected
to the same remote controller (Group control
unit), other unit No. is displayed every pushing
UNIT
button.)
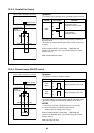
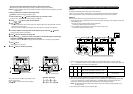
2. When you want to know position of the indoor unit using the address
• To confirm the unit numbers in a group control;
<Procedure> (Operation while the air conditioner stops)
The indoor unit numbers in a group control are successively displayed, and the corresponding indoor fan is
turned on. (Operation while the air conditioner stops)
1
Push
VENT
+
TEST
buttons simultaneously for
4 seconds or more.
• Unit No. is displayed.
• The fans of all the indoor units in a group
control are turned on.
2
Every pushing
UNIT
button, the indoor unit
numbers in the group control are succes-
sively displayed.
• The firstly displayed unit No. indicates the
address of the header unit.
• Only fan of the selected indoor unit is turned
on.
3
Push
TEST
button to finish the procedure.
All the indoor units in group control stop.
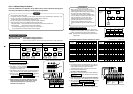
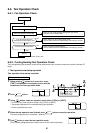
Operation procedure
1 2
Operation procedure
1 2 3
End
2
1
Operate
1
ON / OFF
FAN
TEMP.
SWING/FIXTIME
MODE
VENT
UNITSET CL
FILTER
RESET
TEST
TIMER SET
CODE No.
UNIT No.
End
3
2
ON / OFF
FAN
TEMP.
SWING/FIXTIME
MODE
VENT
UNITSET CL
FILTER
RESET
TEST
TIMER SET
CODE No.
UNIT No.
SETTING
DATA
SET
R.C. No.
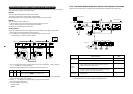
• To confirm all the unit numbers from an arbitrary wired remote controller;
<Procedure> (Operation while the air conditioner stops)
The indoor unit No. and position in the same refrigerant line can be confirmed.
An outdoor unit is selected, the indoor unit numbers in the same refrigerant line are successively displayed,
and then its indoor unit fan is turned on.
1
Push the timer time +
TEST
buttons simultaneously for 4 seconds or more.
Firstly, the line 1, item code )+ (Address Change) is displayed. (Select outdoor unit.)
2
Using
UNIT
+
SWING/FIX
buttons, select the line
address.
3
Using
SET
button, determine the selected line
address.
• The indoor unit address, which is connected to the
refrigerant pipe of the selected outdoor unit is dis-
played and the fan is turned on.
4
Every pushing
UNIT
button, the indoor unit
numbers in the identical pipe are successively
displayed.
• Only fan of the selected indoor unit operates.
[To select another line address]
5
Push
CL
button to return to procedure
2
).
• The indoor address of another line can be succes-
sively confirmed.
6
Push
TEST
button to finish the procedure.
Change of indoor address from remote controller
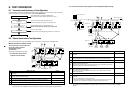
Change of indoor address from wired remote controller
• To change the indoor address in individual operation (Wired remote controller : Indoor unit = 1 : 1) or
group control (When the setup operation with automatic address has finished, this change is available.)
<Procedure> (Operation while air conditioner stops)
1
Push simultaneously
SET
+
CL
+
TEST
buttons for 4 seconds or more.
(The firstly displayed unit No. indicates the header unit in group control.)
2
In group control, select an indoor unit No. to be changed by
UNIT
button.
(The fan of the selected indoor unit is turned on.)
3
Using the setup temp. / buttons, set !
to the item code.
4
Using the timer time / buttons, change the
displayed setup data to a data which you want
to change.
5
Push
SET
button.
6
Using the
UNIT
button, select the unit No. to be
changed at the next time. Repeat the procedure
4
to
6
and change the indoor address so that it
is not duplicated.
7
After the above change, push
UNIT
button to
confirm the changed contents.
8
If it is acceptable, push
TEST
button to finish
confirmation.
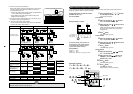
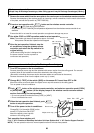
Operation procedure
1 2 3 4
5
6 7 8
End
Operation procedure
1 2 3
4
5 6
End
2,
6,
7
4
5
6
1
3
2
4
ON / OFF
FAN
TEMP.
SWING/FIXTIME
MODE
VENT
UNITSET CL
FILTER
RESET
TEST
TIMER SET
CODE No.
UNIT No.
SETTING
DATA
SET
R.C. No.
3
5
8
1
ON / OFF
FAN
TEMP.
SWING/FIXTIME
MODE
VENT
UNITSET CL
FILTER
RESET
TEST
TIMER SET
CODE No.
UNIT No.
SETTING
DATA
SET
R.C. No.