


Basic Administration of the SPA9000
Configuring Basic Settings
SPA9000 Voice System Administration Guide 30
2
• “Configuring Multicast Addressing and Group Paging,” on page 33
• “Collecting System Logs and Debug Information,” on page 36
Setting Up the WAN Connection for the SPA9000
The SPA9000 becomes a DHCP client of any server on the network. The
recommended setting is to use a static IP address. This configuration provides
ease of installation and prevents connectivity issues that would occur if the IP
address of the SPA9000 changed.
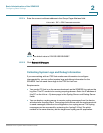
STEP 1 Connect to the SPA9000 administration web server, and choose Admin access
with Advanced settings. (See “Connecting to the SPA9000 Administration Web
Server,” on page 27.)
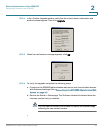
STEP 2 Click Router tab > Wan Setup.
STEP 3 From the
Connection Type
drop-down list, choose Static IP.
STEP 4 In the
Static IP Settings
area, enter the Static IP of the SPA9000, as well as the
NetMask
and
Gateway
for your network.
STEP 5 In the
Optional Settings
area, enter the Primary DNS for your network.
NOTE It is recommended to set an IP address that is outside the address range
assigned by the DHCP server. For example, if the DHCP server assigns IP
addresses in the range from 192.168.1.50 to 192.168.1.254, you should select
a static IP address between 192.168.1.2 and 192.168.1.49.
STEP 6 Click Submit All Changes. The SPA9000 reboots.
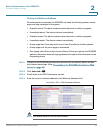
Setting the Date and Time
The date and time appear on the phone display and are used to activate the
daytime and nighttime Auto Attendant settings. Normally the date and time are set
by the network, which has a connection to an NTP server. If needed, you can
identify the NTP server on the Voice > Wan Setup page, Optional Settings
section.