


Administering the SPA400 and Voice Mail Service
Configuring a SPA400 for Voice Mail Service
SPA9000 Voice System Administration Guide 120
5
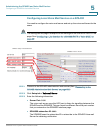
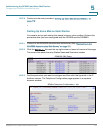
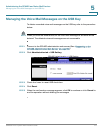
STEP 3 Scroll down to the
Auto Attendant Parameters
section.
STEP 4 Edit the AA
Dial Plan 1
string to include a code for the voice mail server, as
described below.
• SYNTAX: (10x|xxx.|<dialcode:vmmN>)
• EXAMPLE: (10x|xxx.|<8:vmm2>)
• dialcode: The digit that users dial, when prompted by the Auto Attendant, to
access voice mail remotely.
NOTE The Contact List for this line must be configured for the Auto Attendant to
answer.
• MailboxManageNumber: The Mailbox Manage Number that was entered on the
SPA400 Voice mail Settings page. If you followed the instructions in the
procedure “Configuring a SPA400 to Interoperate with the SPA9000,” on
page108, you set 800 as the Mailbox Manage Number.
• vmmN: Replace N with the number of the SPA9000 line interface (Line 1 ... Line
4) that is configured for the SPA400 voice mail server.
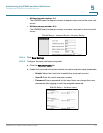
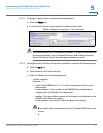
STEP 5 Copy and paste the same string into the AA Dial Plan 2 field, for the purpose of
allowing remote access of voice mail at all times of day. For more information
about AA Dial Plans, refer to “Configuring Dial Plans for the Auto Attendant,” on
page150.
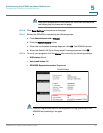
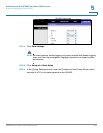
STEP 6 Click Voice tab > Line
N
, where N is the number of the line interface for this
SPA400 unit.
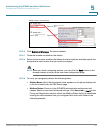
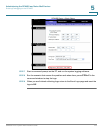
STEP 7 Make sure that the
VMSP Bridge
,
XFER Bridge Mode
, and
CFWD Bridge Mode
fields are set to all.
STEP 8 Click Submit All Changes. The SPA9000 and the phones reboot.
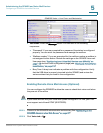
STEP 9 To verify your progress, perform the following tasks:
a. Dial into the site from an external number.
b. When the Auto Attendant prompts you for an extension, press 8.
c. When the Voice Mail Server prompts for a mailbox number, enter the mailbox
number.
d. When prompted for a password, enter the password.