


Administering Direct Group Calling (DGC) Groups
This section tells you how to add DGC groups, assign access codes to DGC groups, and add
and remove DGC group members.
Keep the following considerations in mind as you
administer DGC groups:
■ You can assign a maximum of 32 DGC groups; therefore, target values (i.e., your
response to the “DGC =“ prompt) will be a number from 1 through 32.
■ Each group can have a maximum of 10 members
■ A station can be a member of only one DGC group. If you attempt to add to a DGC
group a station already assigned to another DGC group, the system generates a warning
message. If you enter c to continue at this point, the system generates another warning,
NO MORE BLOCKS. If you really want to remove the member from its current group and
add it to the new target group, you enter another c. If you do not want to make this
change, just press any other key to abort.
■ If a DGC group has no associated delay announcement, it is useful to administer Personal
Line appearances for the trunks assigned to the DGC group. Assign the Personal Line
appearances to a voice terminal providing coverage for the group, for example, to a
secretary or principal to the group. (Program these line appearances to ring. ) Then, if all
stations in the group are busy, incoming DGC calls will ring on these buttons, providing
an overload indication.
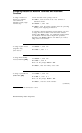
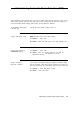
To assign a DGC group
1 From the Main menu prompt, enter 6.
2 At
DGC = , enter the DGC group number, from 1 through
32. Continue with the procedures below to administer the
DGC group.
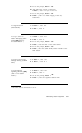
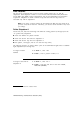
Assign a DGC group Using
Action = 1 , you can determine the access code of an
access code existing DGC group or assign an access code to a new group.
If you assign 0 to an existing group, the group will be
removed.
1 At
Action = , enter 1.
2 At
Data = , enter the DGC access code, or 0.
Note When you remove or change a DGC access code, the
display ID is also removed.
Administering Direct Group Calling (DGC) Groups
11-1