IMI 66-083
Installa’:on
SECTION 4
SOmARE
CARTRIDGE
INTRODUCTION
A plug-in module is required with the common
equipment base unit to provide the following functions:
Operating System Software Control
Defauft Functional Program
Call Cost Storage For System Collected Records
Installing the software cartridge provides the operating
system software control of the digital telephone
system.
All class of service data that is programmed into the
system is stored in the common equipment memory
and not in the software cartridge; therefore, no current
class of service programming is lost if the software
cartridge is replaced. Call cost records, however, are
stored in the software cartridge. If a new software
cartridge is exchanged for the one currently installed
in the common equipment cabinet, all call cost records
that are stored in the installed cartridge are lost.
Because of this, be sure to obtain a print-out of all call
cost records and then delete them from memory
before exchanging a new cartridge for the currently
installed one.
INSTALLATION
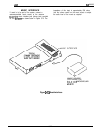
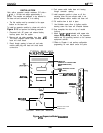
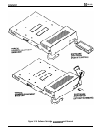
The software cartridge plugs into the common
equipment base unit housing as shown in Figure 3-16.
To avoid any chance of electrostatic
discharge damage to the software
cartridge, avoid touching the connector
with your fingers while handling it.
Be sure to disconnect the AC power to the
base unit (also disconnect battery backup
power if it Is connected) before installing
or removing a software cartridge.
To install a cartridge,
NOTE: Before installing a software cartridge into a
base unit, be sure the product code matches
the product code of the base unit (i-e., place an
SO408 cartridge into a GO408 base unit; place
an SO816 cartridge into a
GO81
6 base unit;
and place an 57632 cartridge into a G 1632
base unit.
1.
Orient the cartidge so that the connector end is
toward the base unit opening and the removal
notch, located at the top rear of the cartridge, is
toward the front of the base unit.
2.
Insert the cartridge into the base unit cabinet with a
steady
gentle pressure until it seats into place.
Then, press the cartridge into place firmly to fully
mate the connections.
To remove a cartridge,
1. Place the bit of a flat-blade screwdriver into the
removal notch. Lift up on the cartridge with the
screwdriver to un-mate the connections.
2.
Slide the cartridge out of the base unit.


