MERLIN LEGEND Communications System Release 6.1
Installation
555-661-140
Issue 1
August 1998
Installing the PC, CAT, or Printer
Page 5-21
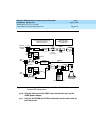
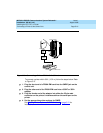
Connecting a Printer to the Control Unit
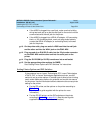
■ If the 400B2 is plugged into a wall jack, make sure that building
wiring has been set up so that the wall jack for the control unit can
communicate with the wall jack for the printer.
■ If the 400B2 is plugged into a BR1A-4P adapter, 102 connecting
block, or 103 connecting block, use 4-pair plug-ended cable to
connect the BR1A-4P adapter (or connecting block) to the wall
jack for the printer.
! On the printer side, plug one end of a D8W cord into the wall jack
and the other end into the WALL jack on the Z3A2 ADU.
! Plug one end of an EIA-232-D cable into the 25-pin male connector
on the Z3A2 ADU and the other end into the serial port on the
printer.
! Plug the 2012D-50M (or 2012D) transformer into a wall outlet.
! Set the appropriate printer options for SMDR.
See “Setting Printer Options and DIP Switches” for instructions.
Setting Printer Options and DIP Switches
If the customer has an Lucent Technologies 572, Lucent Technologies
475/476, CAT, or Lucent Technologies Applications printer, use this
section to set up printer options. If another type of serial printer is being
used, review these setup options for guidance and consult the manual
for the printer. Use the information below to determine the correct printer
setting for the printer:
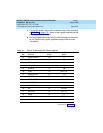
■ For the 572 printer, set the options on the printer according to
Table 5–1.
(See the user’s guide supplied with the printer for more
information.)
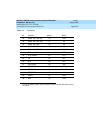
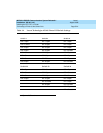
■ For the 475/476 printer, set the DIP switches on the printer
according to Table 5-2 on page 5-24
. (See the user’s guide
supplied with the printer for more information.)


