


4-7
Cisco Wireless IP Phone 7920 Administration Guide for Cisco CallManager Release 3.3 or Later
OL-3930-02
Chapter 4 Using the Cisco 7920 Configuration Utility
How to Install the Cisco 7920 Configuration Utility
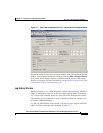
Step 10 Click OK to close the Internet Protocol (TCP/IP) Properties window.
Step 11 Reboot the system. After the system has finished rebooting, reconnect the
Cisco 7920 Wireless IP Phone to your computer.
Note Windows 98 users might see a duplicated network adapter named Cisco 7920 USB
driver in the Device Manager window. Delete this entry.
Related Topics
• Installing the Cisco 7920 Configuration Utility, page 4-4
• Network Connection for the Cisco 7920 Configuration Utility, page 4-7
Network Connection for the Cisco 7920 Configuration Utility
When you launch the Cisco 7920 Configuration Utility from your PC, an attempt
is made to connect to the 192.168.1.x network through the USB interface. If your
wireless network is utilizing the 192.168.1.x network, the USB adapter might fail
to load after you enable the USB on the Cisco Wireless IP Phone 7920. You need
to disable network connectivity between the PC and the 192.168.1.x network. By
changing the 802.11b parameters for the Cisco Wireless IP Phone 7920, the phone
does not authenticate and retrieve an IP address of 192.168.1.x.
To ensure there is no network connectivity between the PC and the 192.168.1.x
network, use the following procedure on the Cisco Wireless IP Phone 7920.
Procedure
Step 1 Choose Network Config > 802.11b Configuration > Wireless Settings,
Step 2 Change either the Service Set Identifier (SSID) or the authentication mode.
Step 3 Power off the phone.
Step 4 Power on the phone.
Step 5 Enable the USB again.