


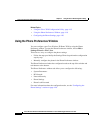


Chapter 4 Using the Cisco 7920 Configuration Utility
How to Use the Cisco 7920 Configuration Utility
4-22
Cisco Wireless IP Phone 7920 Administration Guide for Cisco CallManager Release 3.3 or Later
OL-3930-02
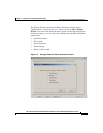
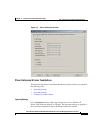
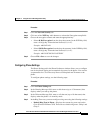
The Use Static radio button in the TFTP Option group is automatically selected.
Step 3 Enter the following static IP settings under the DHCP Client option.
• IP Address—Enter the IP address of the Cisco Wireless IP Phone 7920.
• Subnet Mask—Enter an IP subnet mask address to identify the subnetwork
so that the IP address can be recognized on the LAN.
• Primary TFTP Server— Enter the TFTP server address so that the file
location can be identified.The configuration files and firmware images for the
Cisco Wireless IP Phone 7920 are located on the TFTP server.
• Primary Gateway IP Address—Enter the primary gateway address. The
primary gateway address determines the next network point to which a packet
should be forwarded.
• Primary DNS Server—Enter a DNS server address DNS translates the
Internet domain names into IP addresses.
Step 4 Choose File > Save to save the changes.
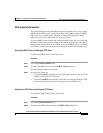
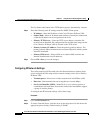
Configuring RF Network Settings
The (radio frequency) RF Network tab in the Phone Preference window allows
you to configure the following wireless network settings for the Cisco Wireless
IP Phone 7920:
• Transmit power—Power level of radio transmission in milliWatts (mW)
• Data rate—Data transmission rate in megabits per second (Mbps)
• Service Set Identifier (SSID)—Identifier for a set of wireless devices to
communicate with each other. Several APs can have the same SSID to support
a group of wireless phones.
To configure the RF Network settings, follow these steps.
Procedure
Step 1 Click the RF Network tab.
Step 2 To set the Transmit Power, click the arrow by the drop-down list and choose the
appropriate power setting. (Default setting is 20mW)