


3-15
Cisco Wireless IP Phone 7920 Administration Guide for Cisco CallManager Release 3.3 or Later
OL-3930-02
Chapter 3 Setting Up the Cisco Wireless IP Phone 7920
Providing Power to the Cisco IP Phone
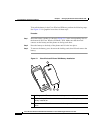
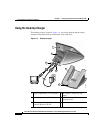
To use the desktop
charger, see Figure 3-4 and follow these steps:
Procedure
Step 1 Plug the AC adapter into a wall outlet, and insert the connector (4) into the back
of the desktop charger.
Step 2 Insert the Cisco Wireless IP Phone 7920 into the upper compartment (1) of the
charger.
Step 3 Insert the spare battery into the lower compartment (2).
Note You can insert and charge the phone with a battery installed alone. Or you
can insert and charge the spare battery alone. Or you can charge both the
phone and the spare battery at the same time.
The LED indicator (5) turns red when the battery is charging. The indicator turns
green when the battery charging is complete. Batteries will stop charging after
they are fully charged. You can leave the phone or batteries in the charger for
extended periods of time with no problems.
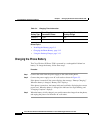
Table 3-5 gives the battery charging time information. Check the LED indicator
for the charging status. You can stop charging the battery when the battery is fully
charged.
Note To use the Cisco 7920 Configuration Utility to import or export settings while
charging the Cisco Wireless IP Phone 7920 and the battery, connect the desktop
charger and your PC with the standard USB A-type to B-type cable, as indicated
Table 3-5 Battery Charging Time and Charging Configuration
Battery Charging Configuration Charging Time
Battery alone 6 hr
Battery installed in the phone 3.5 hr
Both battery installed in the phone and an extra battery 6 hr