


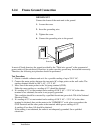
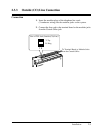
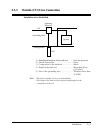

2.2.4 Frame Ground Connection
2-6 Installation
IMPORTANT!!!
Connect the frame of the main unit to the ground.
1. Loosen the screw.
2. Insert the grounding wire.
3. Tighten the screw.
4. Connect the grounding wire to the ground.
In most of North America, the ground provided by the “Third wire ground” at the commercial
power outlet will be satisfactory. However, in some cases this ground may be installed incorrectly.
Therefore, the following test procedure should be performed.
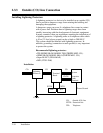
Test Procedure
1. Obtain a suitable voltmeter and set it for a possible reading of up to 250 V AC.
2. Connect the meter probes between the two main AC voltage points on the wall outlet. The
reading obtained should be 108 V AC – 132 V AC.
3. Move one of the meter probes to the 3rd prong terminal (GND).
Either the same reading or a reading of 0 V should be obtained.
4. If a reading of 0 V at one terminal and a reading of 108 V AC – 132 V AC at the other
terminal is not obtained, the outlet is not properly grounded.
This condition should be corrected by a qualified electrician (per article 250 of the National
Electrical Code).
5. If a reading of 0 V at one terminal and a reading of 108 V AC – 132 V AC at the other
terminal is obtained, then set the meter to the “OHMS/RX1” scale, place one probe at the
GND Terminal and the other probe at the terminal which gave a reading of 0 V.
A reading of less than 1 Ω should be obtained.
If the reading is not obtained, the outlet is not adequately grounded. See a qualified
electrician.
Screw
To the ground