


Getting Started
Additional Information
Cisco SPA232D Administration Guide 23
1
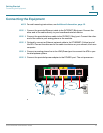
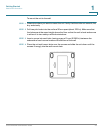
To mount the unit to the wall:
STEP 1 Determine where you want to mount the unit. Verify that the surface is smooth, flat,
dry, and sturdy.
STEP 2 Drill two pilot holes into the surface 58 mm apart (about 2.28 in.). Make sure that
the holes are at the same height above the floor so that the unit is level and secure
in either of its two safety-certified orientations.
STEP 3 Insert a screw into each hole, leaving a gap of 5 mm (0.1968 in.) between the
underside of each screw head and the surface of the wall.
STEP 4 Place the unit wall-mount slots over the screws and slide the unit down until the
screws fit snugly into the wall-mount slots.