


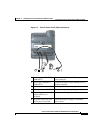


Chapter 2 Installing the Cisco IP Phone Models 7905G and 7912G
Installing the Cisco IP Phone Models 7905G and 7912G
2-14
Cisco IP Phone Models 7905G and 7912G Administrator Guide (SIP)
OL-4277-01
Step 4 Unlock network configuration settings.
For instructions, see the “Unlocking and Locking Configuration Parameters”
section on page 5-4.
Step 5 In the Network Configuration menu, use the Navigation button to select
Alternate TFTP, and then press the Yes softkey.
Step 6 In the Network Configuration menu, use the Navigation button to select TFTP
Server, and then press the Edit softkey.
The current value for the IP address of the TFTP server appears in the Current
Value and the New Value fields.
Step 7 Enter a new IP address in the New Value field.
Use the arrow softkey (<<) to delete existing characters. Use the * key on the
keypad to enter a period (.).
Note When the cursor moves over a character, the character is deleted and a
new character must be entered. You cannot cancel individual character
deletions, but you can use the Cancel softkey to back out of the screen
without saving your changes.
Step 8 Press the Validate softkey.
Step 9 In the Network Configuration menu, use the Navigation button to select Profile
Encrypt Key, and then press the Edit softkey.
Step 10 Enter the encryption key using the keys on the keypad, and then press the
Validate softkey.
For information about entering alpha-numeric characters, see the “Editing
Parameter Values” section on page 5-5.
Step 11 Press the Save softkey.
Step 12 Press the Back softkey and then press the Exit softkey.
The phone downloads its configuration profile and the latest phone software from
the TFTP server.