


Chapter 2 Installing the Cisco IP Phone Models 7905G and 7912G
Installing the Cisco IP Phone Models 7905G and 7912G
2-12
Cisco IP Phone Models 7905G and 7912G Administrator Guide (SIP)
OL-4277-01
Related Topics
• Mounting the Phone to the Wall, page 2-12
• Basic Configuration of the Cisco IP Phone Models 7905G and 7912G,
page 2-13
Mounting the Phone to the Wall
You can mount the Cisco IP Phone on the wall by removing the footstand and
using the mounting bracket on the back of the phone, or you can use special
brackets available in a Cisco IP Phone wall mount kit. (A wall mount kit must be
ordered separately from the phone.) If you attach the Cisco IP Phone to the wall
using the standard footstand and not the wall mount kit, you need to supply the
following tools and parts:
• Screwdriver
• Screws to secure the Cisco IP phone to the wall
To mount the phone on the wall using its mounting bracket, follow these steps:
Procedure
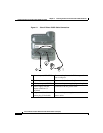
Step 1 Remove the footstand from the phone.
Step 2 Modify the handset rest so that the handset remains on the ear-piece rest when the
phone is vertically placed.
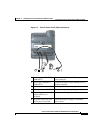
a. Remove the handset from the ear-piece rest.
b. Locate the tab (handset wall hook) at the base of the ear-piece rest.
c. Slide this tab out, rotate it 180 degrees (left to right) to expose a lip on which
the handset catches when the phone is vertical, and reinsert this tab.
d. Place the handset on the ear-piece rest.
For an illustrated procedure of modifying the handset rest, refer to Installing the
Wall Mount Kit for the Cisco IP Phone.