


2-13
Cisco IP Phone Models 7905G and 7912G Administrator Guide (SIP)
OL-4277-01
Chapter 2 Installing the Cisco IP Phone Models 7905G and 7912G
Installing the Cisco IP Phone Models 7905G and 7912G
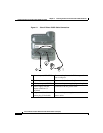
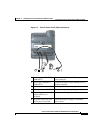
Step 3 Insert two screws into a wall stud or into wall anchors, matching the screws to the
two screw holes on the back of the phone.
The keyholes fit standard phone jack mounts.
Step 4 Hang the phone on the wall.
Basic Configuration of the Cisco IP Phone Models 7905G and
7912G
The basic configuration of a Cisco IP Phone provides the phone with the minimal
information that it needs to download its complete operational configuration
profile from a TFTP server. This information includes a value to enable TFTP
downloads, a value for the URL for the TFTP server that stores the phone’s
complete configuration file (also known as a profile), and a value for the
encryption key.
The following steps explain how to perform this basic configuration for the
Cisco IP Phone.As administrator, you can preconfigure a phone before it is
shipped to the end user. Then, after the end user connects a phone as described in
the “Physical Installation of the Cisco IP Phone Models 7905G and 7912G”
section on page 2-7, the phone automatically downloads the configuration profile
and the latest phone software from the TFTP server. The phone is ready for use
within seconds.
If preconfiguration is not possible, the end user can perform these steps after
connecting the phone.
Procedure
Step 1 Press the Menu button to access the Services menu.
Step 2 In the Services menu, use the Navigation button to select Settings, and then press
the Select softkey.
Step 3 In the Settings menu, use the Navigation button to select Network
Configuration, and then press the Select softkey.