


Chapter 2 Installing the Cisco IP Phone Models 7905G and 7912G
Connecting to the Network
2-4
Cisco IP Phone Models 7905G and 7912G Administrator Guide (SIP)
OL-4277-01
Related Topics
• Connecting to the Network, page 2-4
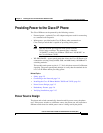
• Providing Power to the Cisco IP Phone, page 2-5
• Installing the Cisco IP Phone Models 7905G and 7912G, page 2-6
• Verifying Installation, page 2-15
Connecting to the Network
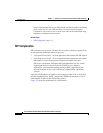
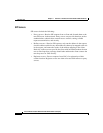
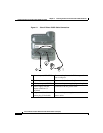
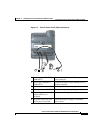
The Cisco IP Phone 7912G has two RJ-45 ports labelled “10/100 SW” and
“10/100 PC.” Each port supports 10/100 Mbps half- or full-duplex connections to
external devices. The Cisco IP Phone 7905G has one RJ-45 port labeled
“10 BASET.” This port supports 10 Mbps half- or full-duplex connections to
external devices. You can use Category 3 or 5 cabling for 10-Mbps connections,
but you must use Category 5 cabling for 100 Mbps connections. Cisco
recommends that you use full-duplex mode on all ports (set at the switch) to avoid
collisions.
Use the 10BASET port on the Cisco IP Phone 7905G or the 10/100 SW port on
the Cisco IP Phone 7912G to connect a phone to the network. You must use a
straight-through cable on these ports. A phone can also obtain inline power over
these connections.
Use the 10/100 PC port on the Cisco IP Phone 7912G to connect a network device,
such as a computer, to the phone. You must use a straight-through cable on this
port.
Figure 2-1 shows the connection ports on the back of the Cisco IP Phone 7905G.
Figure 2-2 shows the connection ports on the back of the Cisco IP Phone 7912G.
Related Topics
• Safety, page 2-2
• Providing Power to the Cisco IP Phone, page 2-5
• Installing the Cisco IP Phone Models 7905G and 7912G, page 2-6
• Verifying Installation, page 2-15